
Crafting Immersive Worlds: A Blender and Photoshop Workflow for Digital Artists
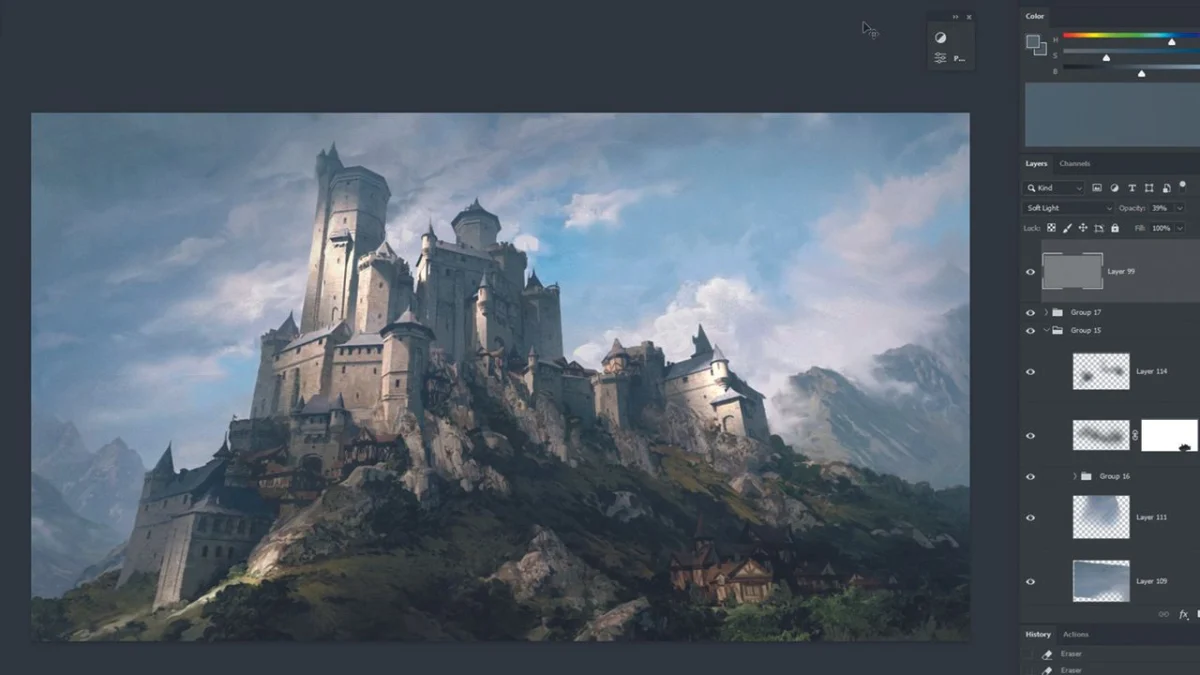
This comprehensive guide delves into an advanced workflow for digital artists, demonstrating how to leverage the power of free 3D software, Blender, and the industry-standard image editor, Photoshop, to construct compelling illustrations. Moving beyond basic modeling, this tutorial showcases techniques for creating detailed scenes, from initial block-outs to the final polished artwork, all without relying on expensive plugins or pre-made assets. The focus is on building foundational skills that empower artists to achieve professional results with accessible tools, ultimately transforming raw 3D renders into richly textured, painterly digital art.
This article is part of a series exploring the fundamentals of 3D art and animation. For further insights, explore our in-depth articles on 3D art workflows, mastering the smoothing and hardening of 3D models, and understanding the fundamental components of 3D objects. If you’re looking to equip yourself with the necessary tools, consult our guides to the best 3D modeling software and the top laptops for 3D modeling.
The Genesis of a Digital Landscape: From Basic Forms to Textured Assets
The journey into creating intricate digital environments often begins with a clear vision and a systematic approach. This workshop outlines a process that emphasizes building foundational elements in Blender, then refining them through the creative lens of Photoshop. The core principle is to develop a versatile asset library that can be manipulated and combined to construct complex scenes. The artist’s goal is to transcend the inherent "3D look" of renders, integrating organic textures and painterly touches to achieve a more artistic and immersive final image. The example used throughout this guide is the creation of a fantasy castle, chosen for its recognizable structure and the opportunity to demonstrate various modeling and texturing techniques without overcomplicating the design process. For those facing challenges with design, adhering closely to reference material and even recreating it precisely is encouraged, as the primary objective is to master the underlying techniques.
Phase 1: Building the Foundation in Blender
The initial stages of scene creation involve establishing the core structural elements. This phase focuses on breaking down complex forms into manageable building blocks and preparing them for detailed texturing and assembly.
01. Preparation: Laying the Groundwork with Basic Forms
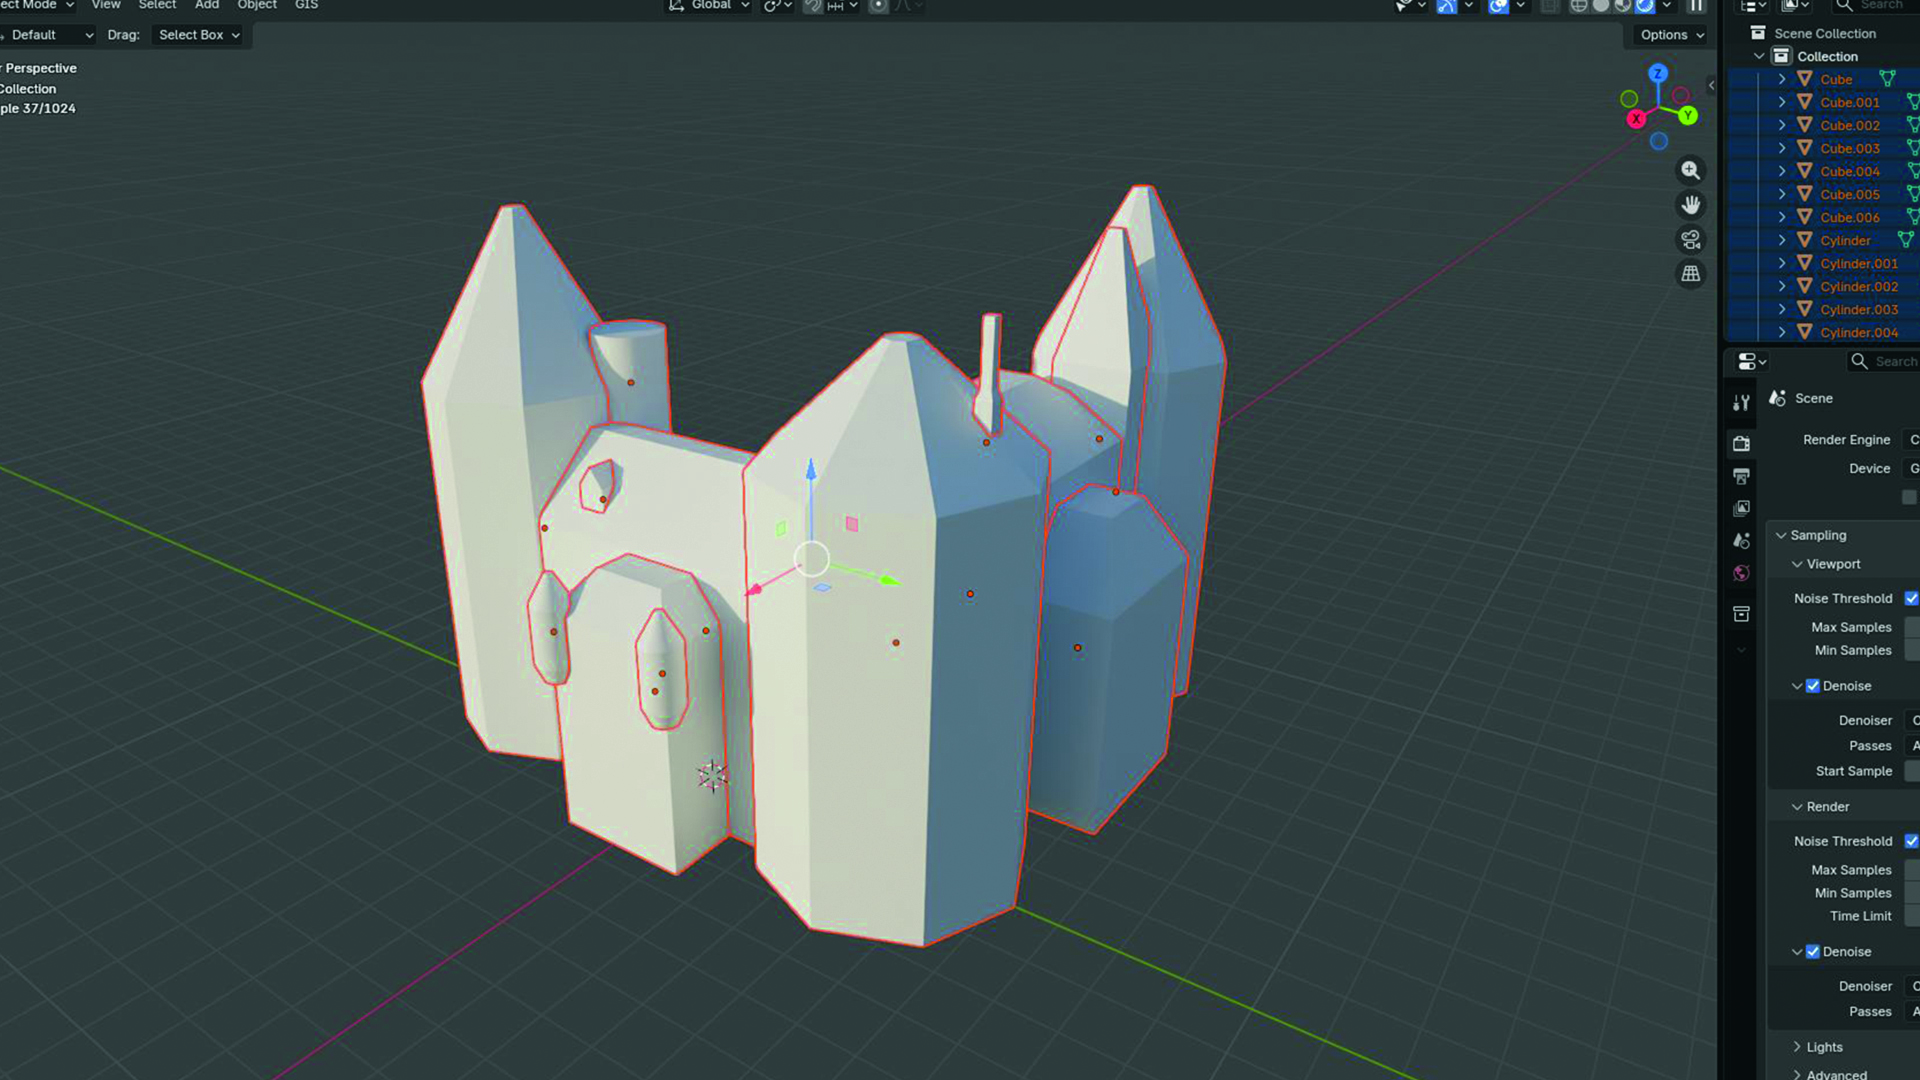
Overcoming the daunting "blank canvas" syndrome is often achieved by immediately establishing the foundational elements of a scene. The process begins with selecting a reference image—in this case, a castle from Wikipedia—and recreating its primary structure using the simplest geometric shapes. This approach, akin to building with wooden toy blocks, allows for a clear understanding of the overall form and shape language before diving into intricate details.
This foundational step is crucial for understanding the scale and proportions of the intended scene. By focusing on silhouette and volume, artists can quickly establish a recognizable base that can be iterated upon.
02. Asset Collection: Sculpting the Components of Your World
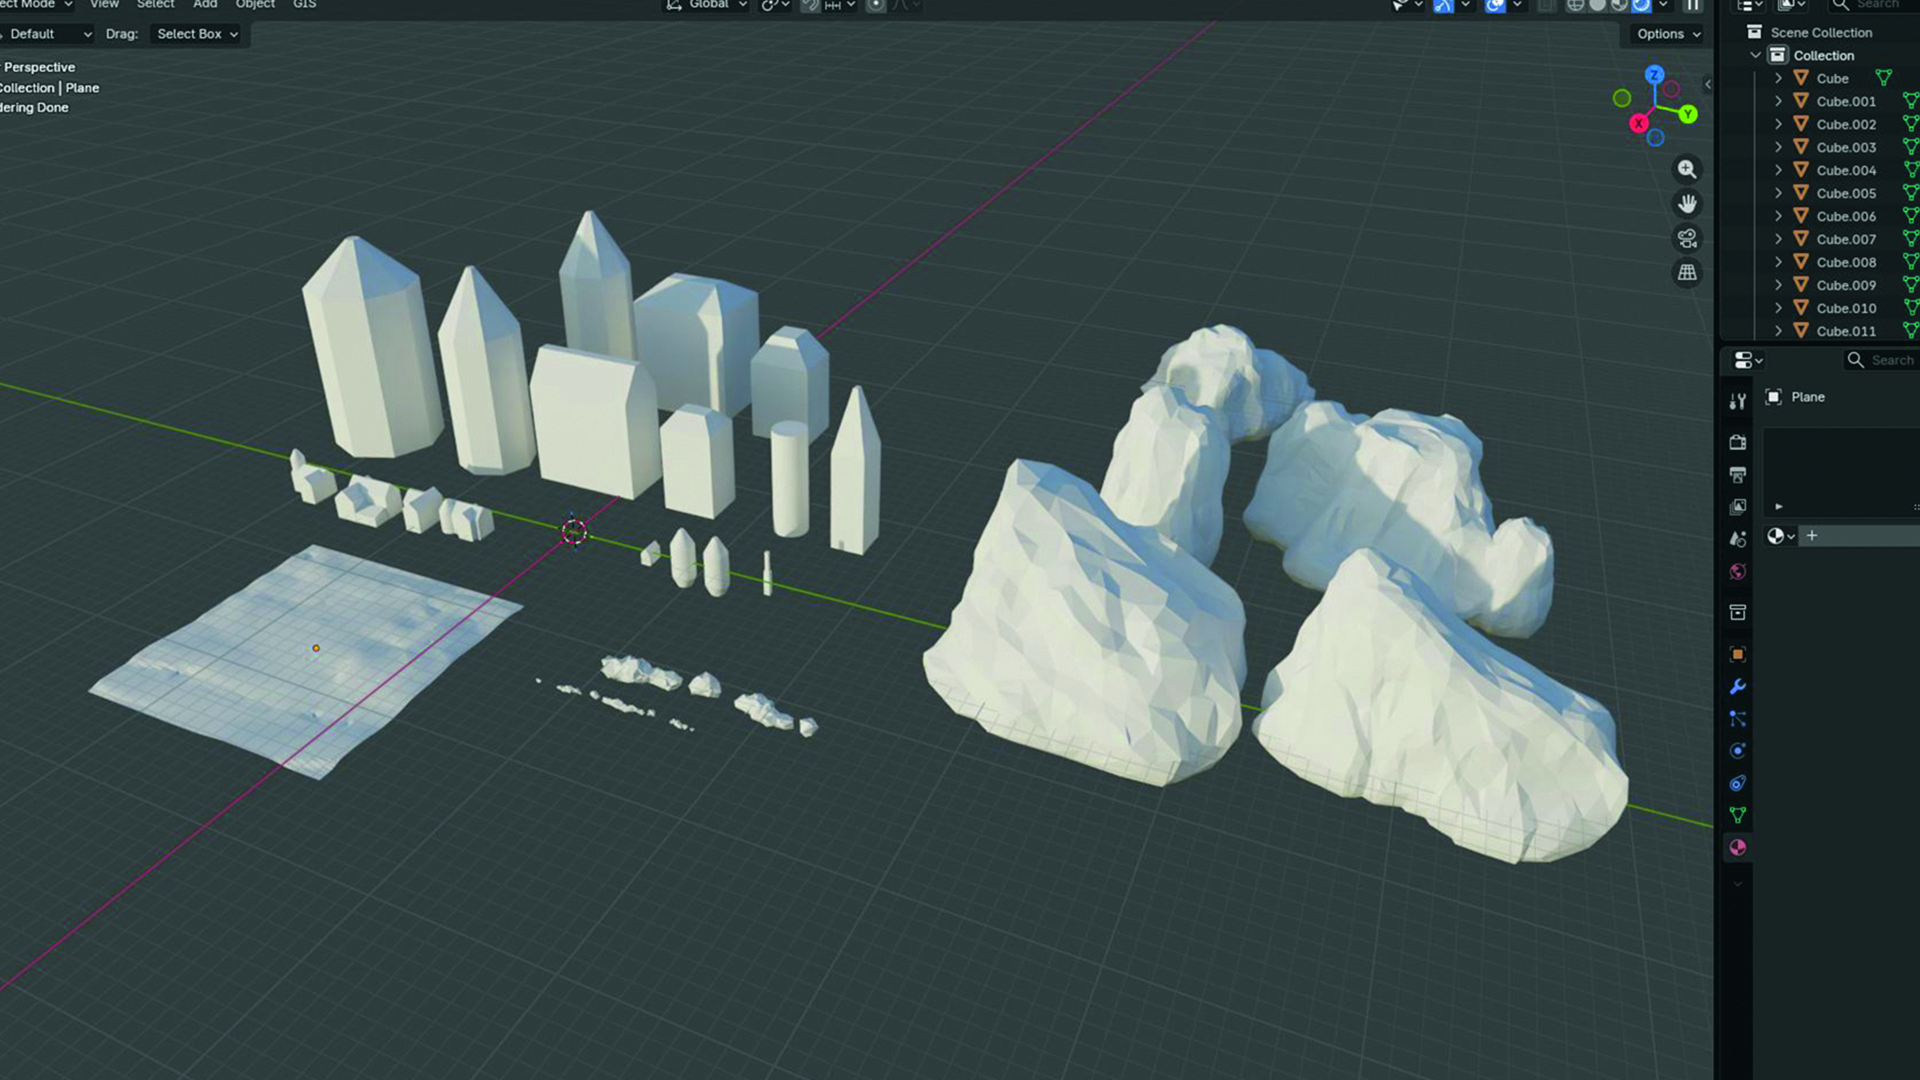
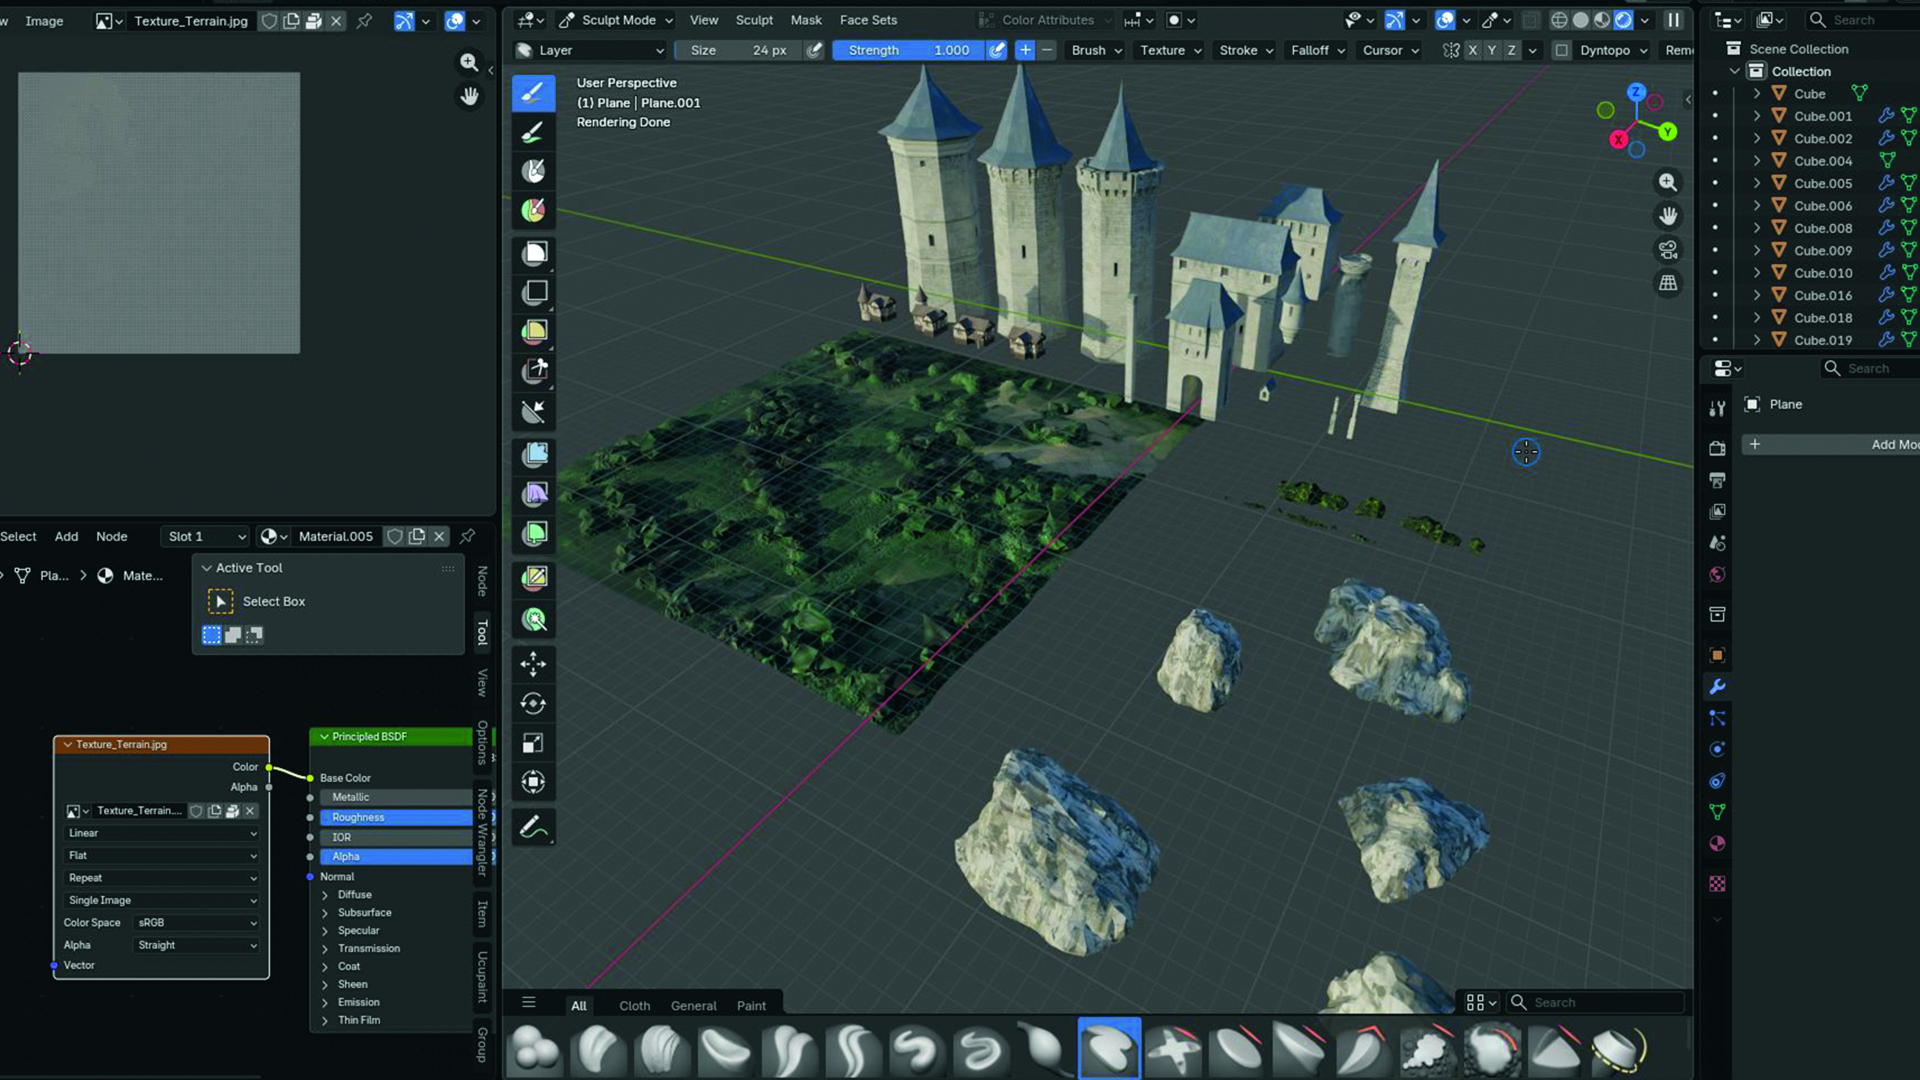
With the basic forms established, the next step is to create a collection of individual assets. These elements are laid out separately and categorized by size: large, medium, and small. This systematic approach ensures that all necessary components, from the main castle structures to smaller details like terrain features and additional houses, are accounted for.
A critical aspect of this stage is maintaining accurate scale. Comparing elements against each other—for instance, ensuring that the windows on a house are proportionally consistent with those on a tower—is essential for creating a believable and cohesive environment. This methodical asset creation process ensures that when it comes time to assemble the scene, all parts will fit together harmoniously.
03. Texture Preparation: Crafting the Visual Language
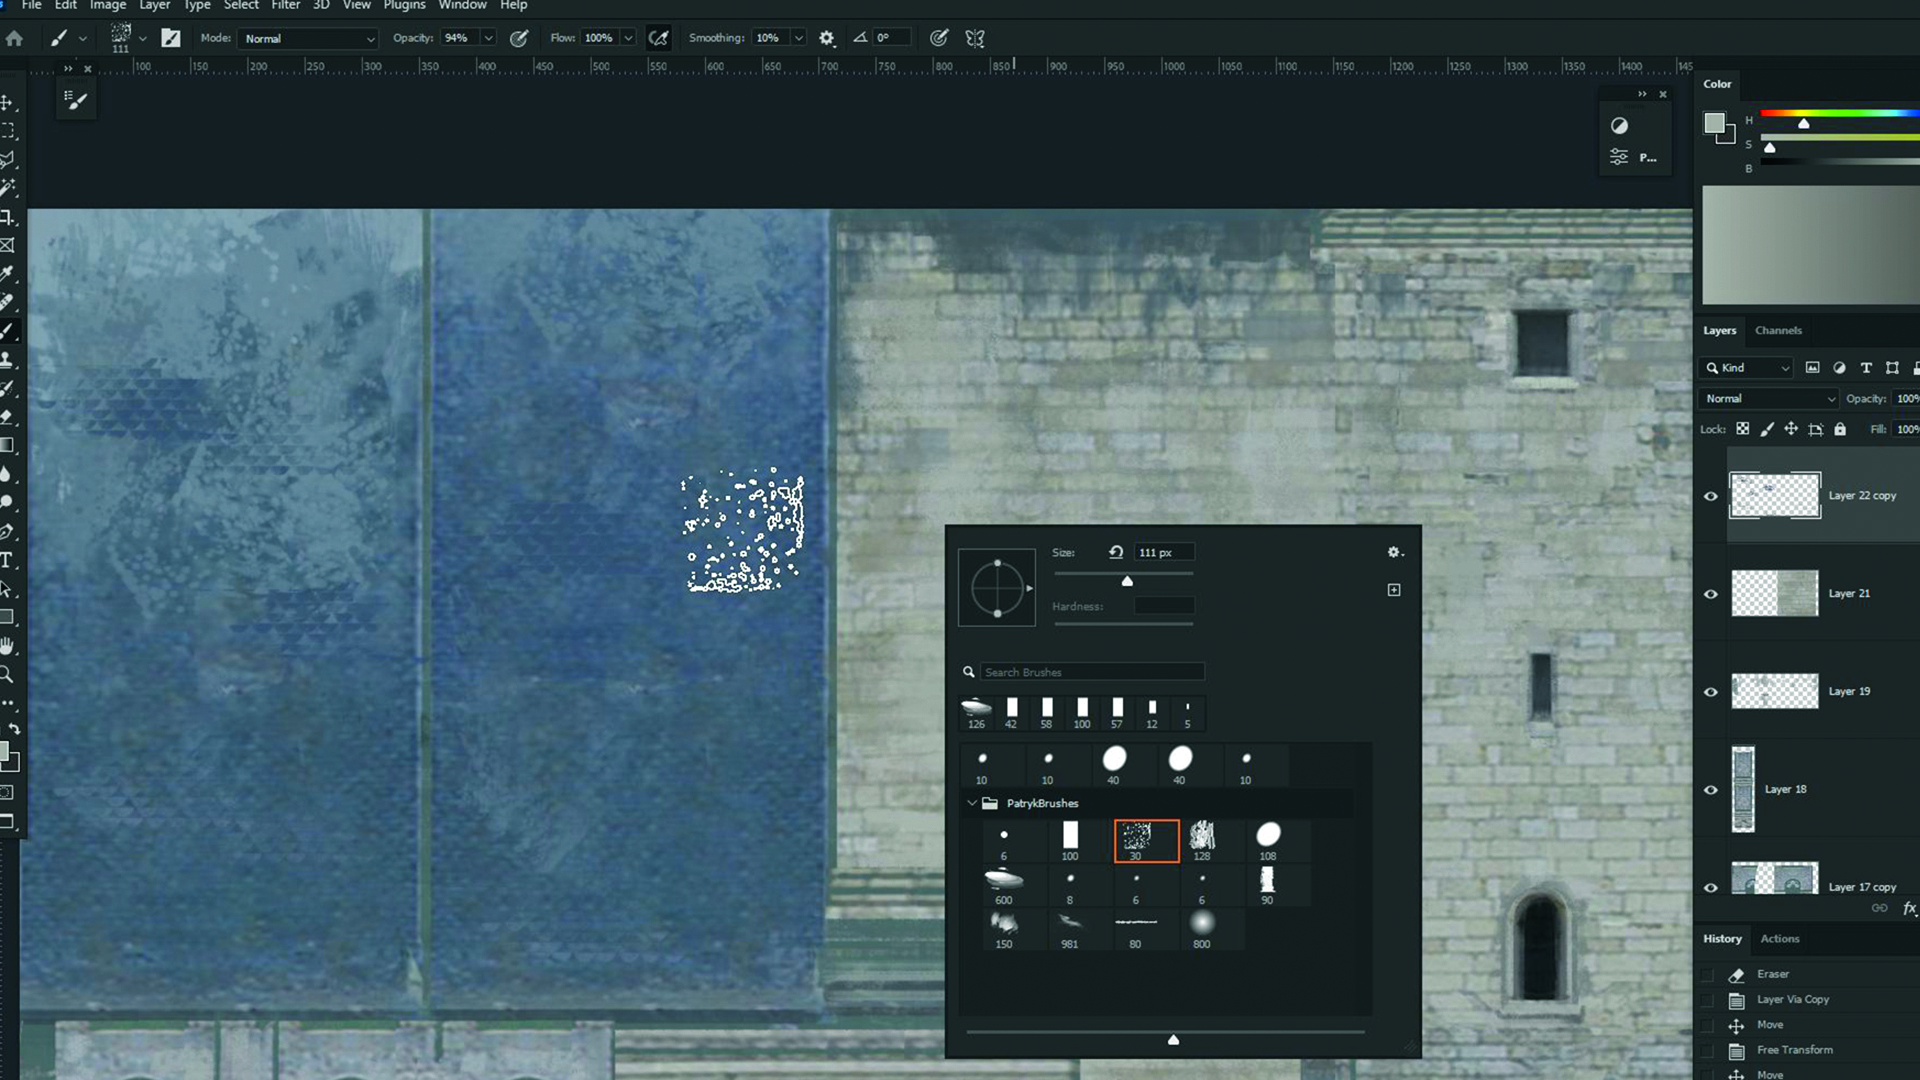
Transitioning into Photoshop, the focus shifts to preparing the textures that will breathe life into the 3D models. This involves creating a collage or "trim sheet" of textures intended for specific groups of assets, such as walls and roofs for the castle elements. The artist employs photobashing techniques, stretching, blending, and overpainting source images to achieve the desired aesthetic.
Filters like "Dust & Scratches" can be applied to alter photographic elements, lending them a more painterly quality. Furthermore, details such as windows, ledges, and columns are often directly painted onto plain wall textures, integrating them seamlessly into the material. This preparation stage is vital for ensuring that the 3D models will have rich and varied surfaces.
04. Texture Application: Mapping Detail onto Geometry
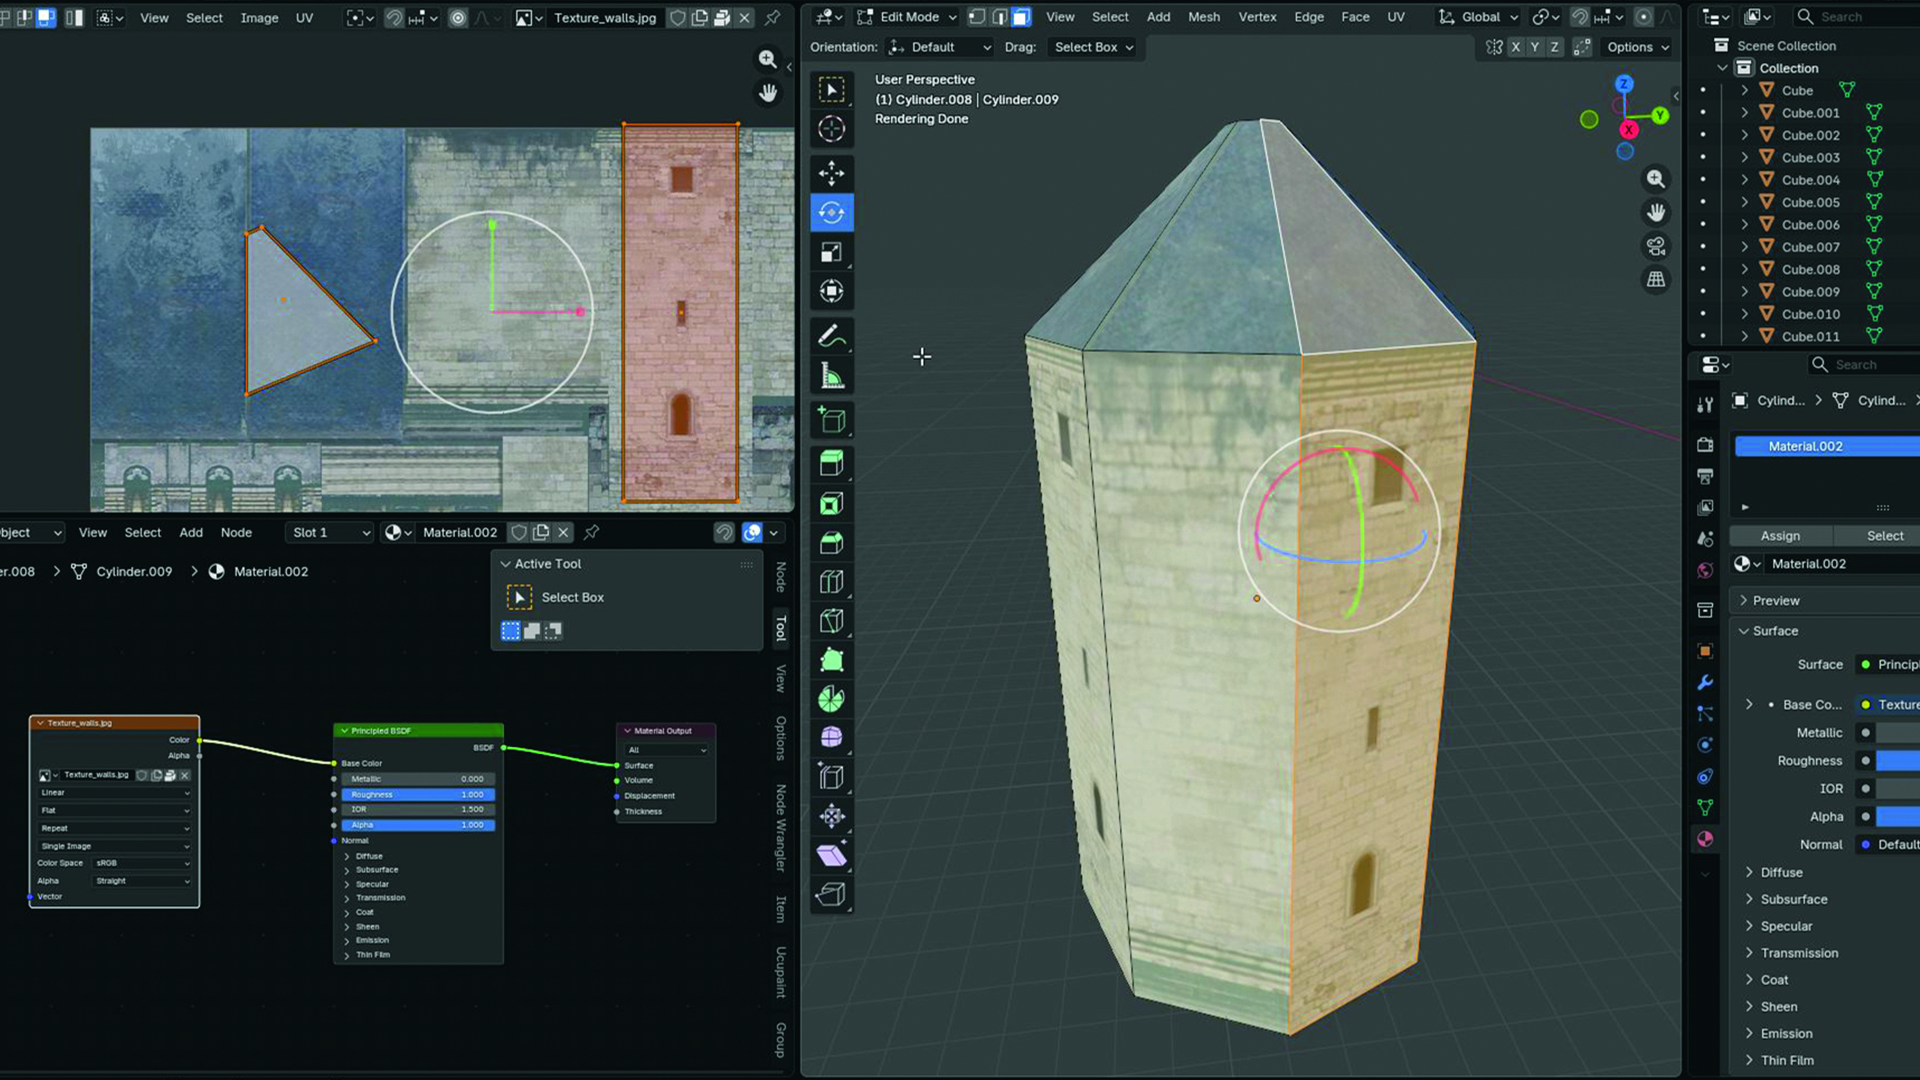
In Blender, the prepared textures are imported into the Shader Editor. The texture image is connected to the "Base Color" input of a "Principled BDSF" node, forming the primary visual surface of the 3D objects. A minor adjustment is made by setting the "Roughness" value to 1, which generally results in a more matte, less reflective surface, often suitable for stone or aged materials.
The UV Editor plays a key role here, displaying how the texture is mapped onto the faces of the 3D models. It’s imperative to ensure that the scale of the model is reset and that the UVs are projected correctly to avoid stretching or distortion of the texture. This meticulous mapping process ensures that the meticulously prepared textures are applied accurately and effectively.
05. Advanced Modeling: Leveraging Textures for Detail
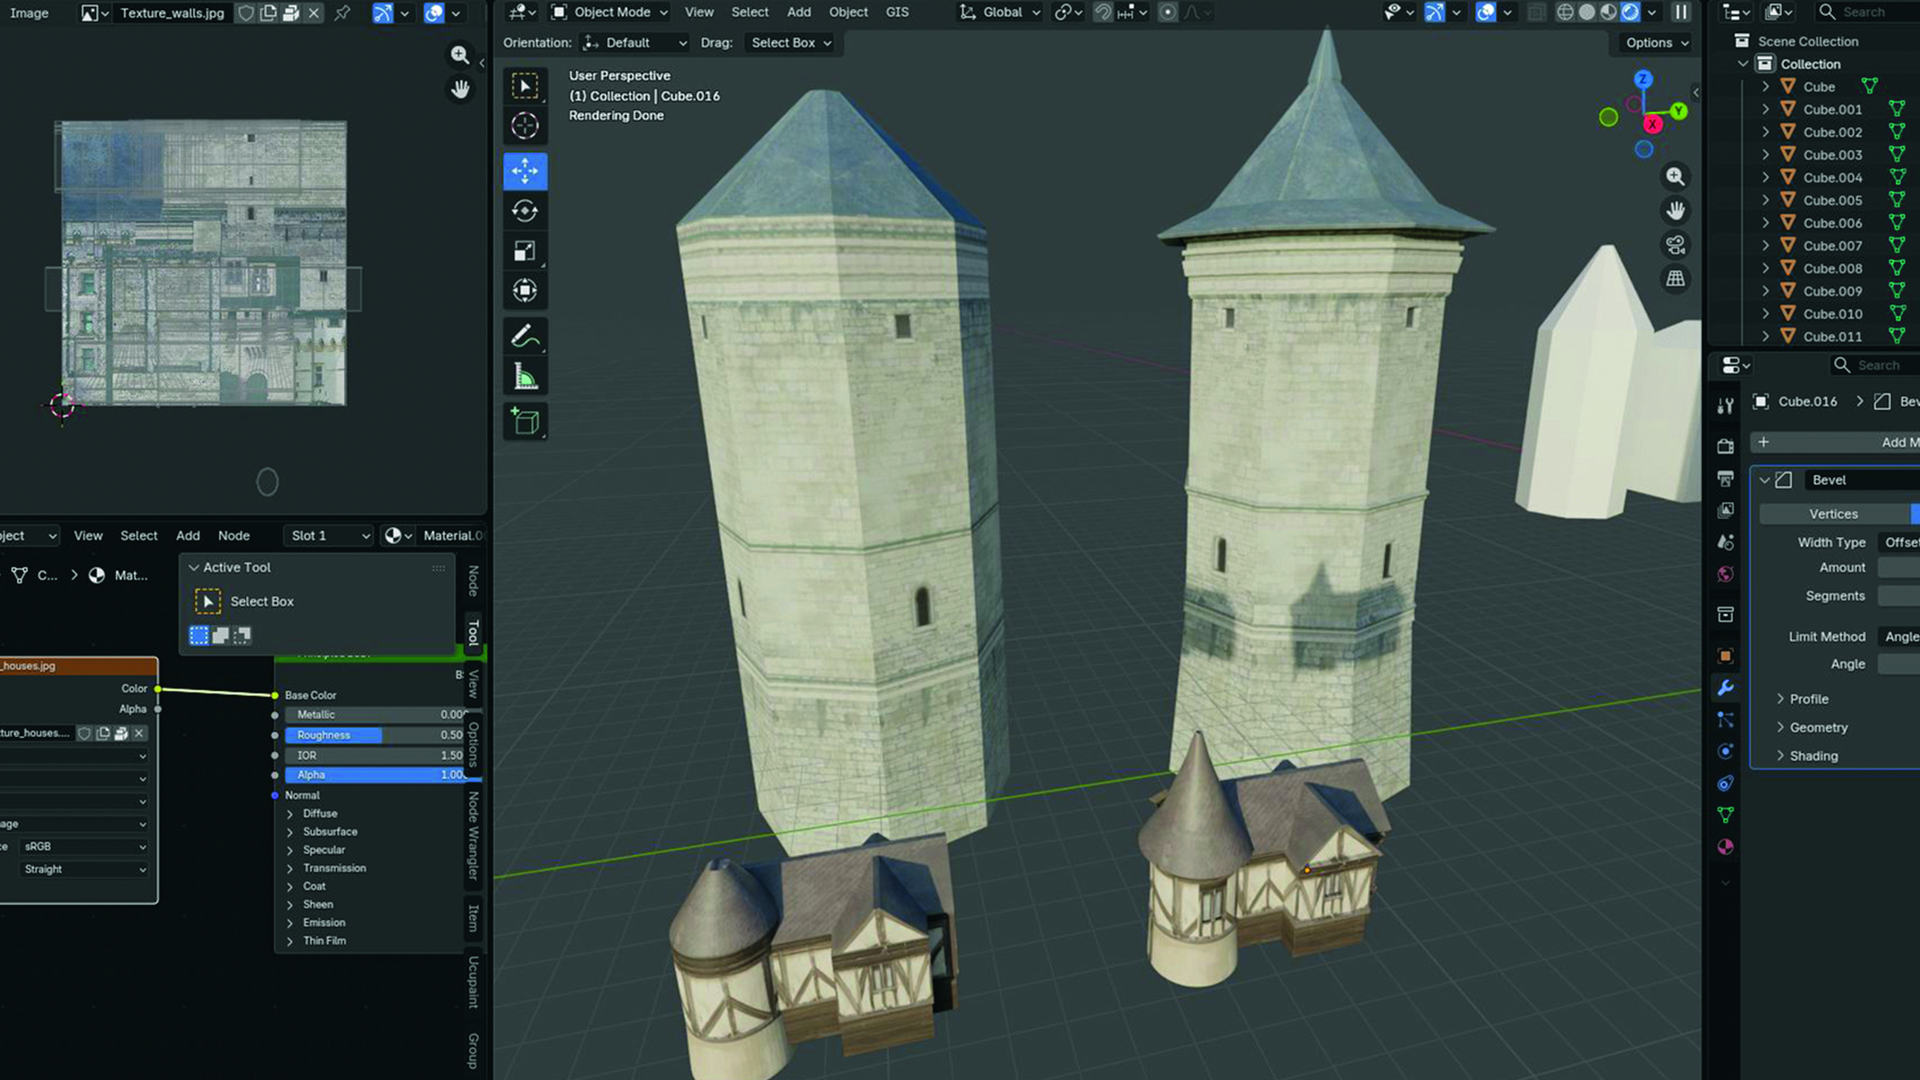
The prepared textures can serve as invaluable guides for adding intricate details to the 3D models. The example demonstrates this by showing a basic tower and house on the left, and on the right, the same models with details extruded based on the patterns visible in their corresponding textures. This technique allows artists to quickly add elements like chimneys, wooden planks, or balconies, enhancing the visual complexity of the scene without extensive manual modeling.
This method is particularly effective for adding procedural or repetitive details that would be time-consuming to model from scratch. By using textures as a blueprint, artists can efficiently enrich their models and create a more believable and visually interesting environment.
06. Scene Assembly: Bringing the Elements Together
The principles of texture application and modeling are extended to the terrain and rock elements. The process begins with photobashing and overpainting the texture, which is then applied to a plane. Sculpting a rough representation of trees is achieved by repeatedly tapping a brush onto a subdivided surface.
To optimize performance and prevent the scene from becoming too demanding on computing resources, a "Decimate" modifier is often applied to these models. This modifier reduces the polygon count while aiming to preserve the overall shape, ensuring that the models remain structurally simple and manageable. This step is crucial for maintaining a smooth workflow, especially in complex scenes.
07. Scene Setup: Orchestrating the Digital Stage
A new Blender file is opened to serve as the final scene assembly space. This workspace is typically divided into several key areas: a large central window for arranging and composing the scene elements, a bottom-left panel dedicated to textures, and a bottom-right panel displaying the camera view. The camera view is set to "Viewport Shading" to provide a real-time preview of the final rendered output. Keeping this camera view relatively small allows the artist to focus on the overall composition without being distracted by excessive detail.
This organized setup facilitates an efficient workflow, allowing for rapid iteration and experimentation with different arrangements and lighting scenarios.
08. Playing with the Blocks: Iterative Composition and Lighting
With the foundational assets in place, the artist can now begin assembling the scene. This involves copying assets from the established collection and experimenting with their placement and arrangement. Crucially, the direction of the sun and the camera angle are adjusted iteratively until a satisfying composition is achieved.
This flexible block-out approach allows for the rapid exploration of multiple scene layouts, lighting conditions, and camera perspectives. A valuable tip for artists facing creative blocks is to first recreate a scene from a reference image and then deconstruct it, breaking it apart to discover unique and novel compositions.
09. Atmosphere and Embellishments: Adding Depth and Mood
To further enhance the visual narrative, additional atmospheric elements are introduced. Clouds are generated using Blender’s basic "Noise Texture" node, with its scale and "Color Ramp" settings manipulated to cast shadows within the scene. Simple fog is created using a "Principled Volume" node. Additionally, a photograph of clouds, applied to a plane and connected to the "Emission" setting in the texture properties, can be used to create realistic atmospheric effects.
These atmospheric elements play a vital role in establishing mood and depth, adding layers of realism and visual interest to the overall composition.
10. The Grand Assembly: Integrating Elements for Impact
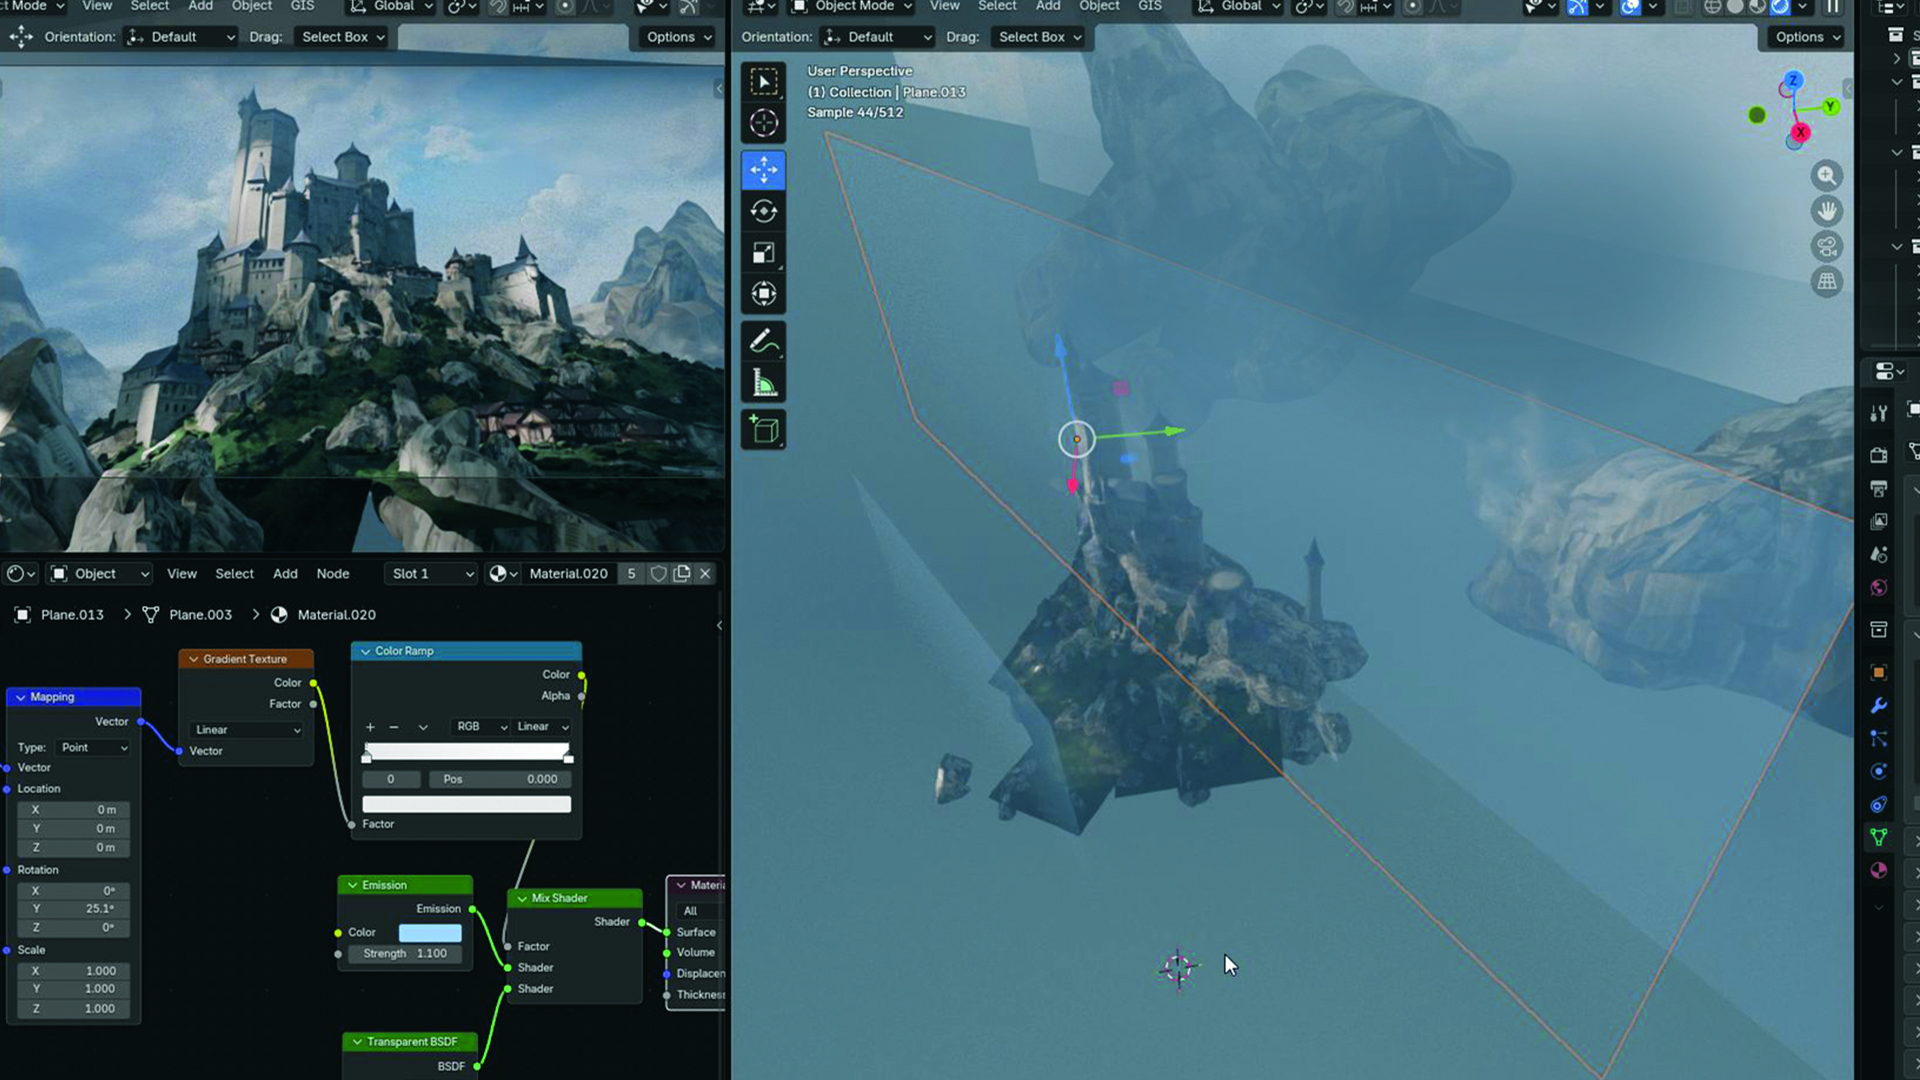
All the created assets—models, terrain, atmospheric elements—are brought together to form the final scene. Area Lights are strategically placed to accentuate highlights in areas that deserve emphasis, guiding the viewer’s eye. Simple planes, utilizing a subtle mix of "Emission" and "Transparency," are employed to reinforce the visual separation between the foreground, midground, and background. These techniques effectively mimic stages of overpainting commonly performed in Photoshop, laying the groundwork for the post-processing phase.
This meticulous integration of elements ensures that the scene feels cohesive and visually dynamic, setting the stage for the final refinement in Photoshop.
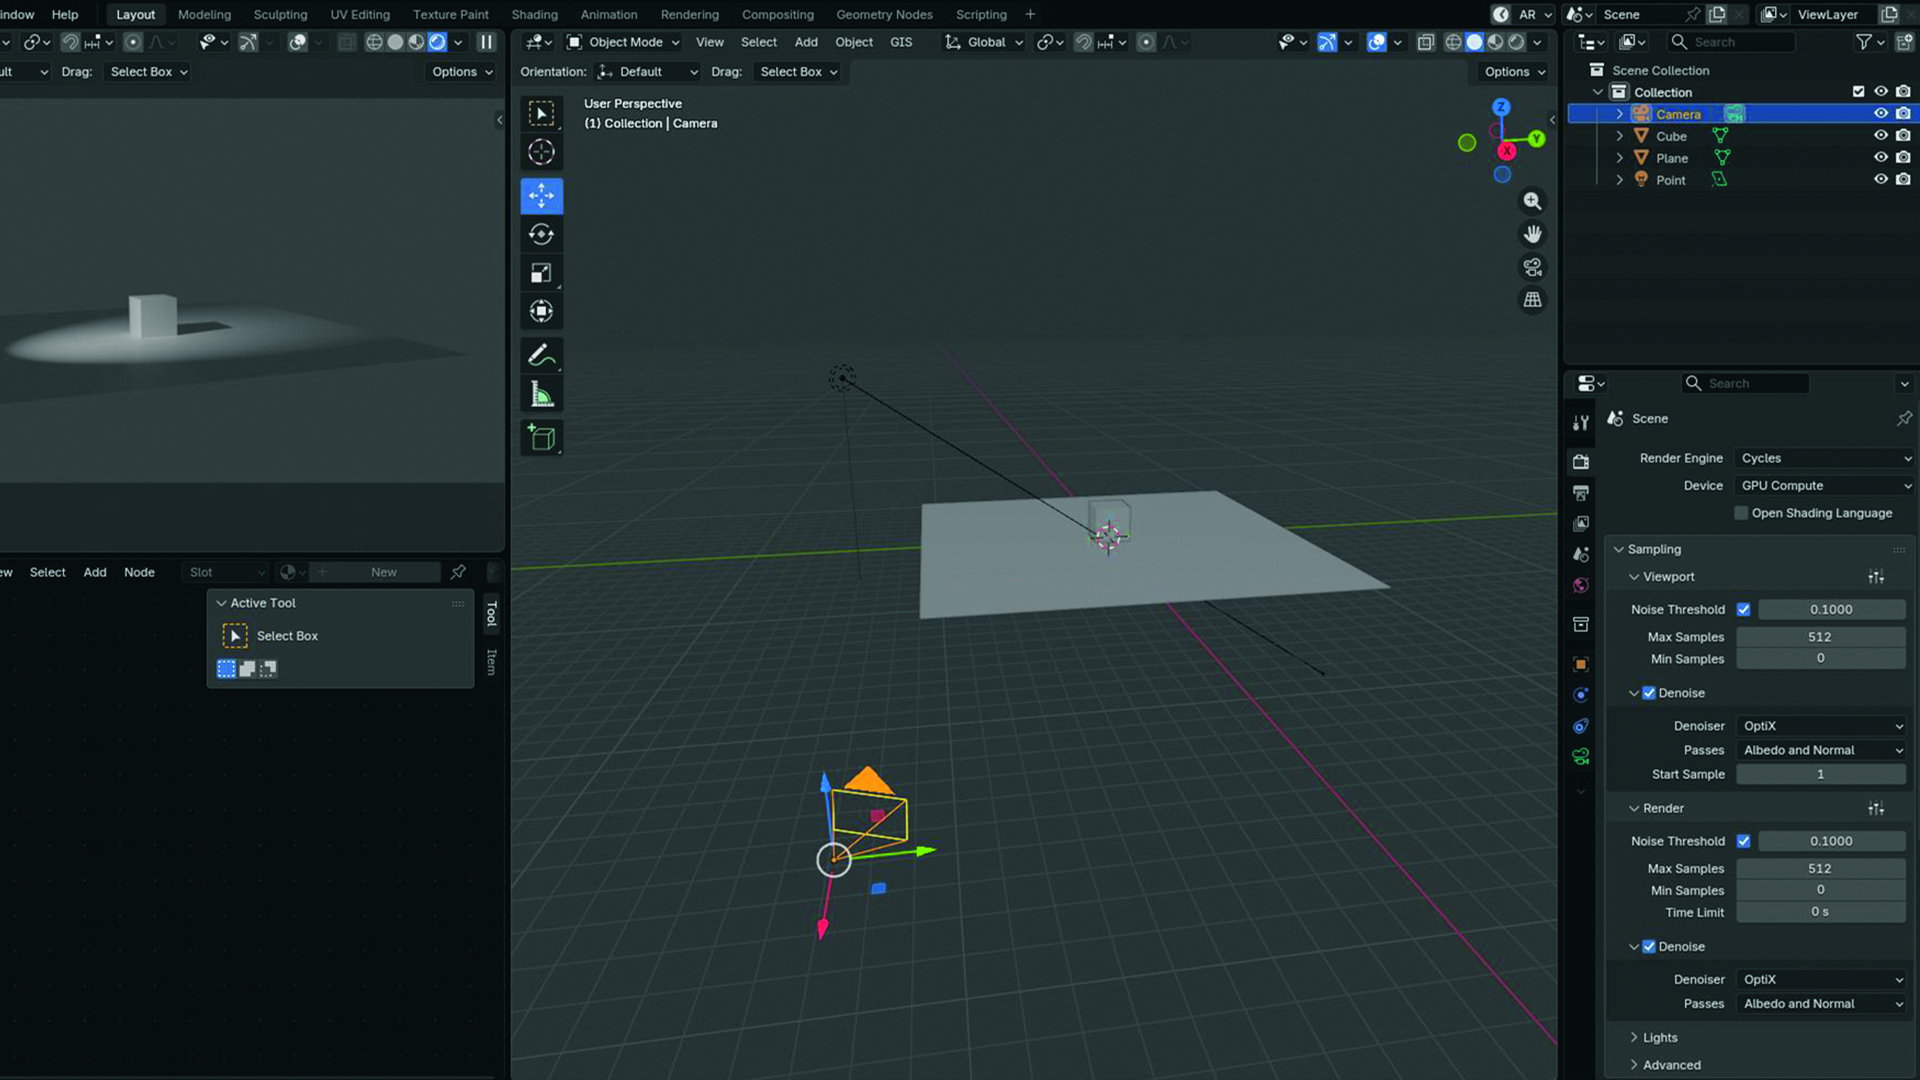
11. Blender’s Compositor: Refining the Render
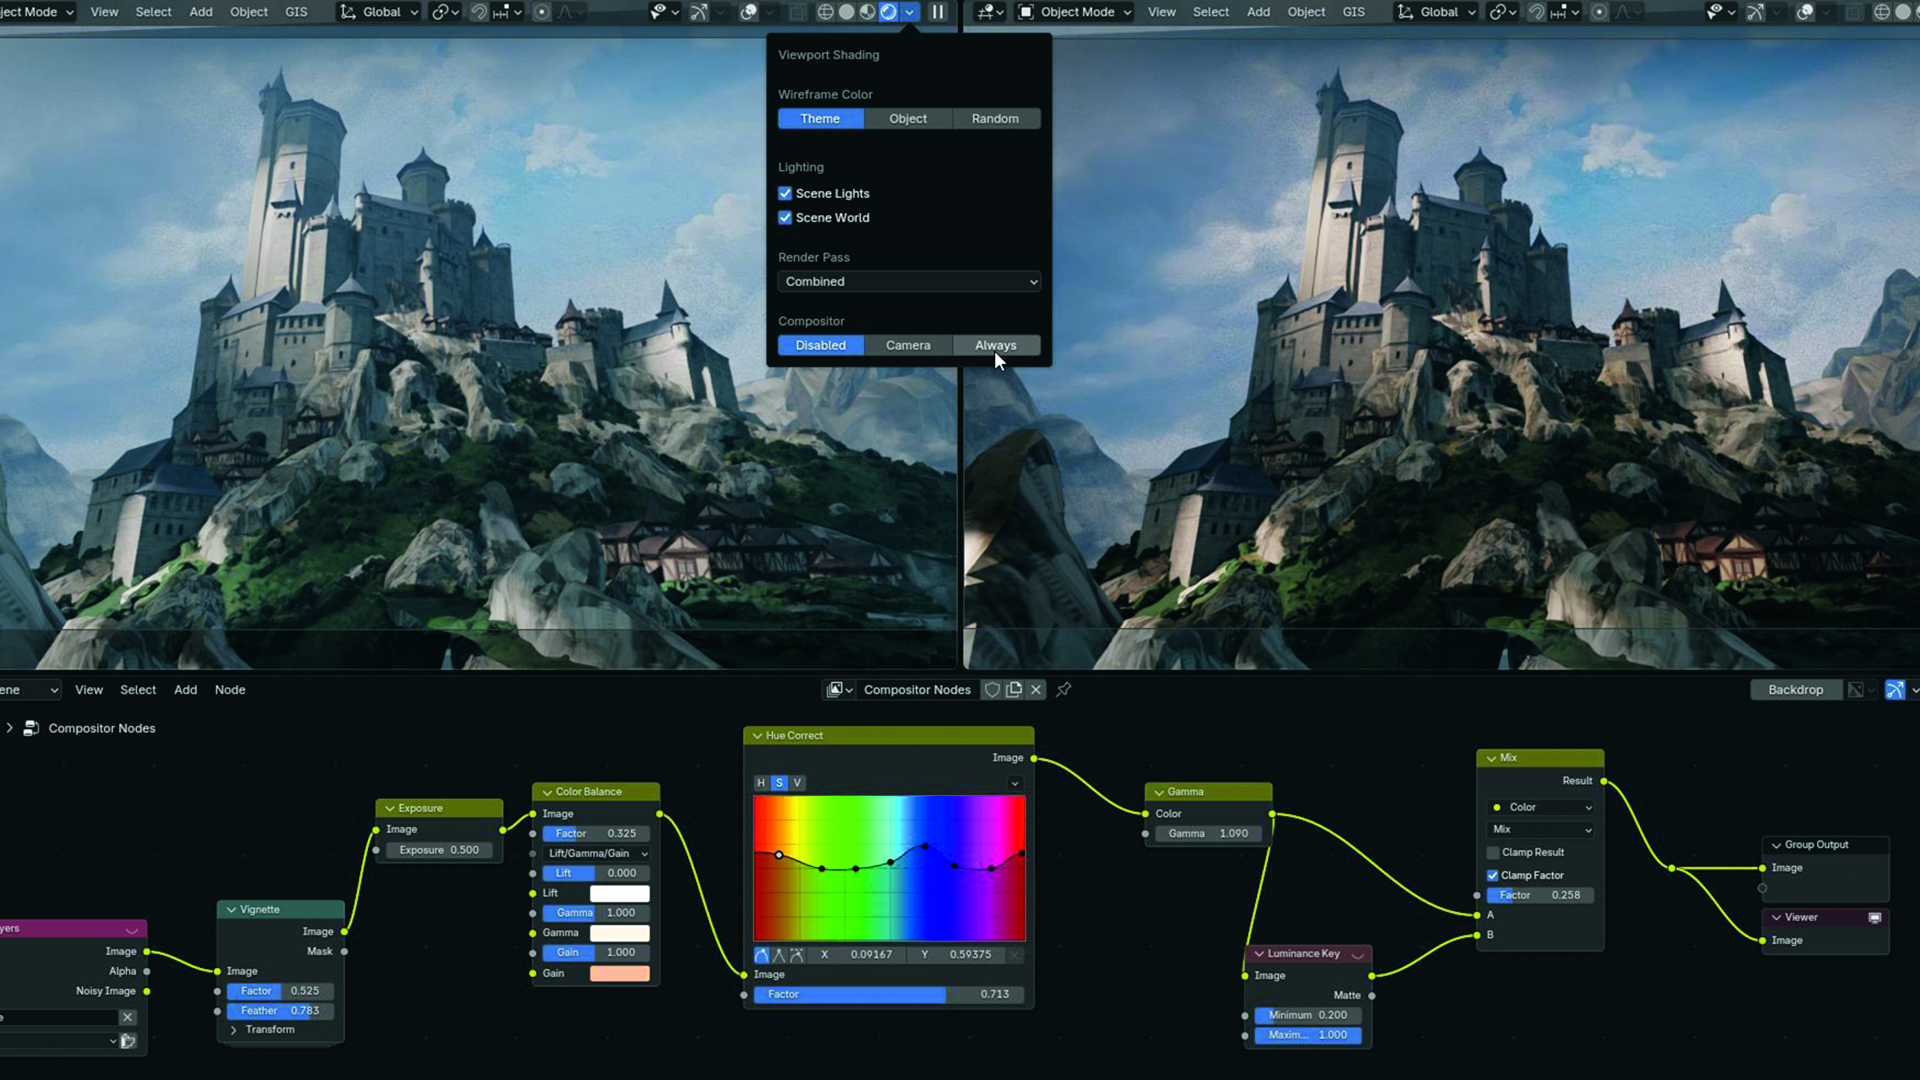
The artist invariably utilizes Blender’s Compositor to further refine the rendered output. This powerful tool allows for post-render adjustments such as color correction, the addition of realistic lens effects, and numerous other enhancements. In this instance, a node is used to introduce warm tones to the highlights, the exposure is boosted, and a subtle vignette effect is applied. A key setting to remember is changing "Disabled" to "Always" in the Viewport Shading options window to ensure these compositing effects are visible in real-time.
The Compositor acts as a bridge between the raw 3D render and the final artistic vision, enabling precise control over the image’s mood and aesthetic.
Phase 2: The Painterly Touch in Photoshop
With the 3D scene rendered and composited, the focus shifts to Photoshop, where the raw render is transformed into a polished piece of digital art through photobashing and overpainting.
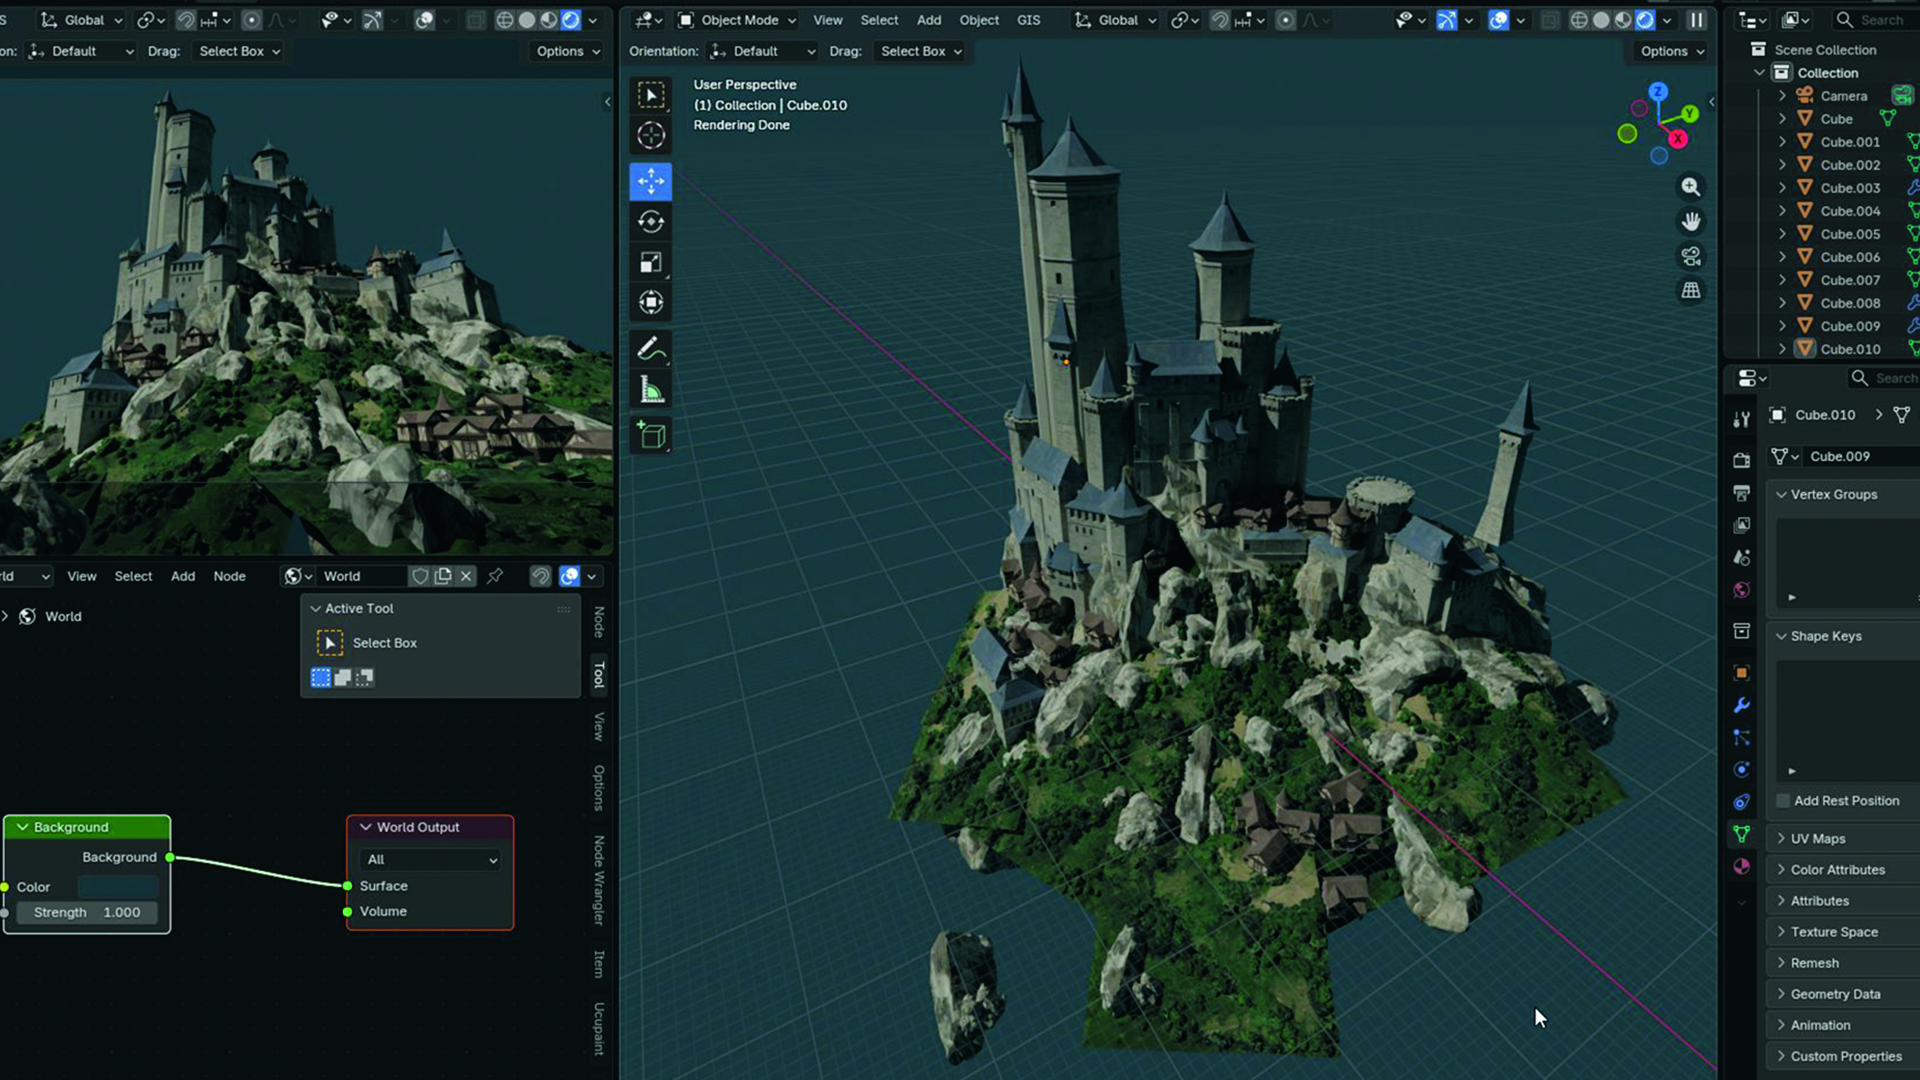
12. Photoshop Setup: Preparing the Canvas
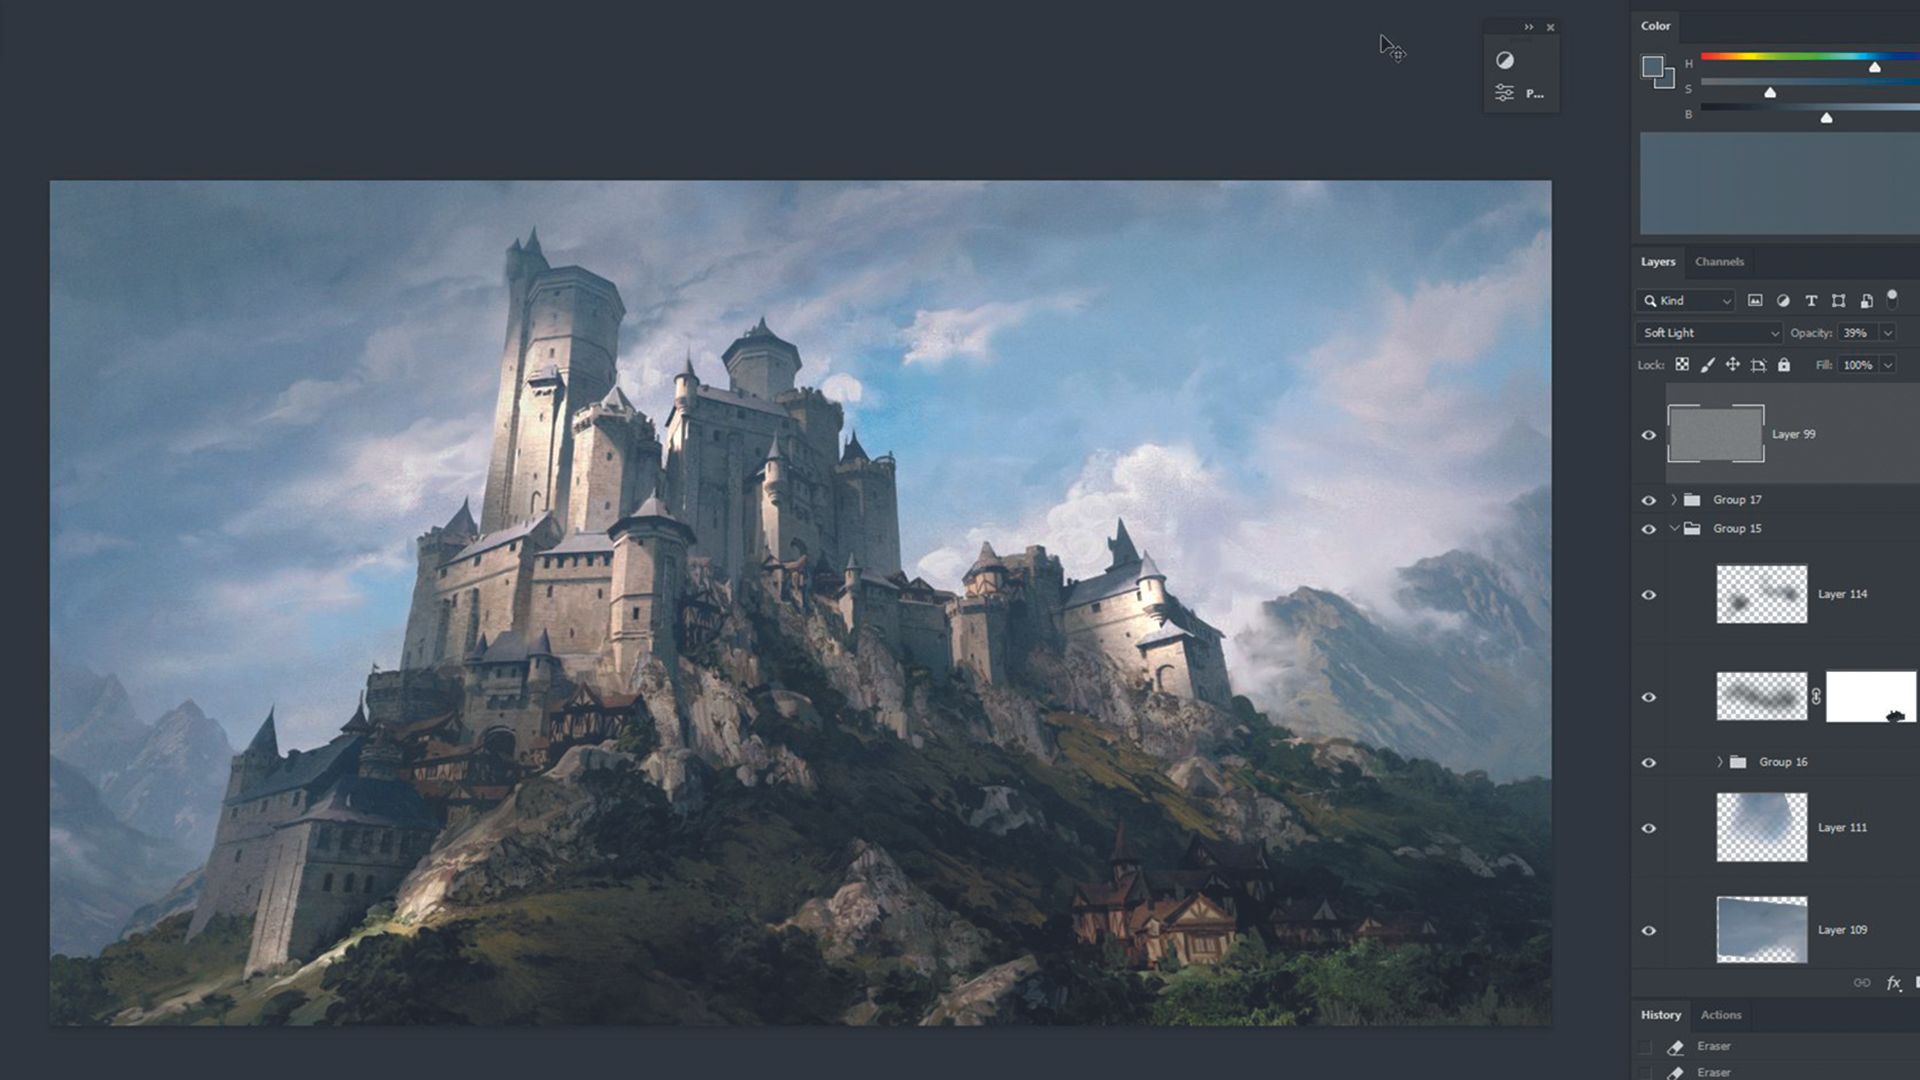
A second, smaller Photoshop window is opened and scaled down to allow for a comprehensive view of the entire illustration. Alongside this, the "Color," "Layers," and "History" panels are readily accessible, along with an additional window for quickly adding and controlling adjustment layers. At this stage, it’s advisable to zoom in and critically assess the render for any areas that require further attention. If elements are unclear or appear out of place, it may be necessary to return to Blender for rearranging or re-rendering.
This organized workspace and iterative approach ensure that the artist maintains a clear overview of the image while also having the tools to address intricate details.
13. Photobashing and Overpainting: Merging Realism with Artistry
The rendered castle scene is now overlaid with photographic elements, such as images of rocks and countryside, to create a seamless transition. This is achieved through the strategic use of three adjustment layers: "Levels" to control the overall value, and "Color Balance" and "Hue/Saturation" to harmonize the photographic elements with the underlying render.
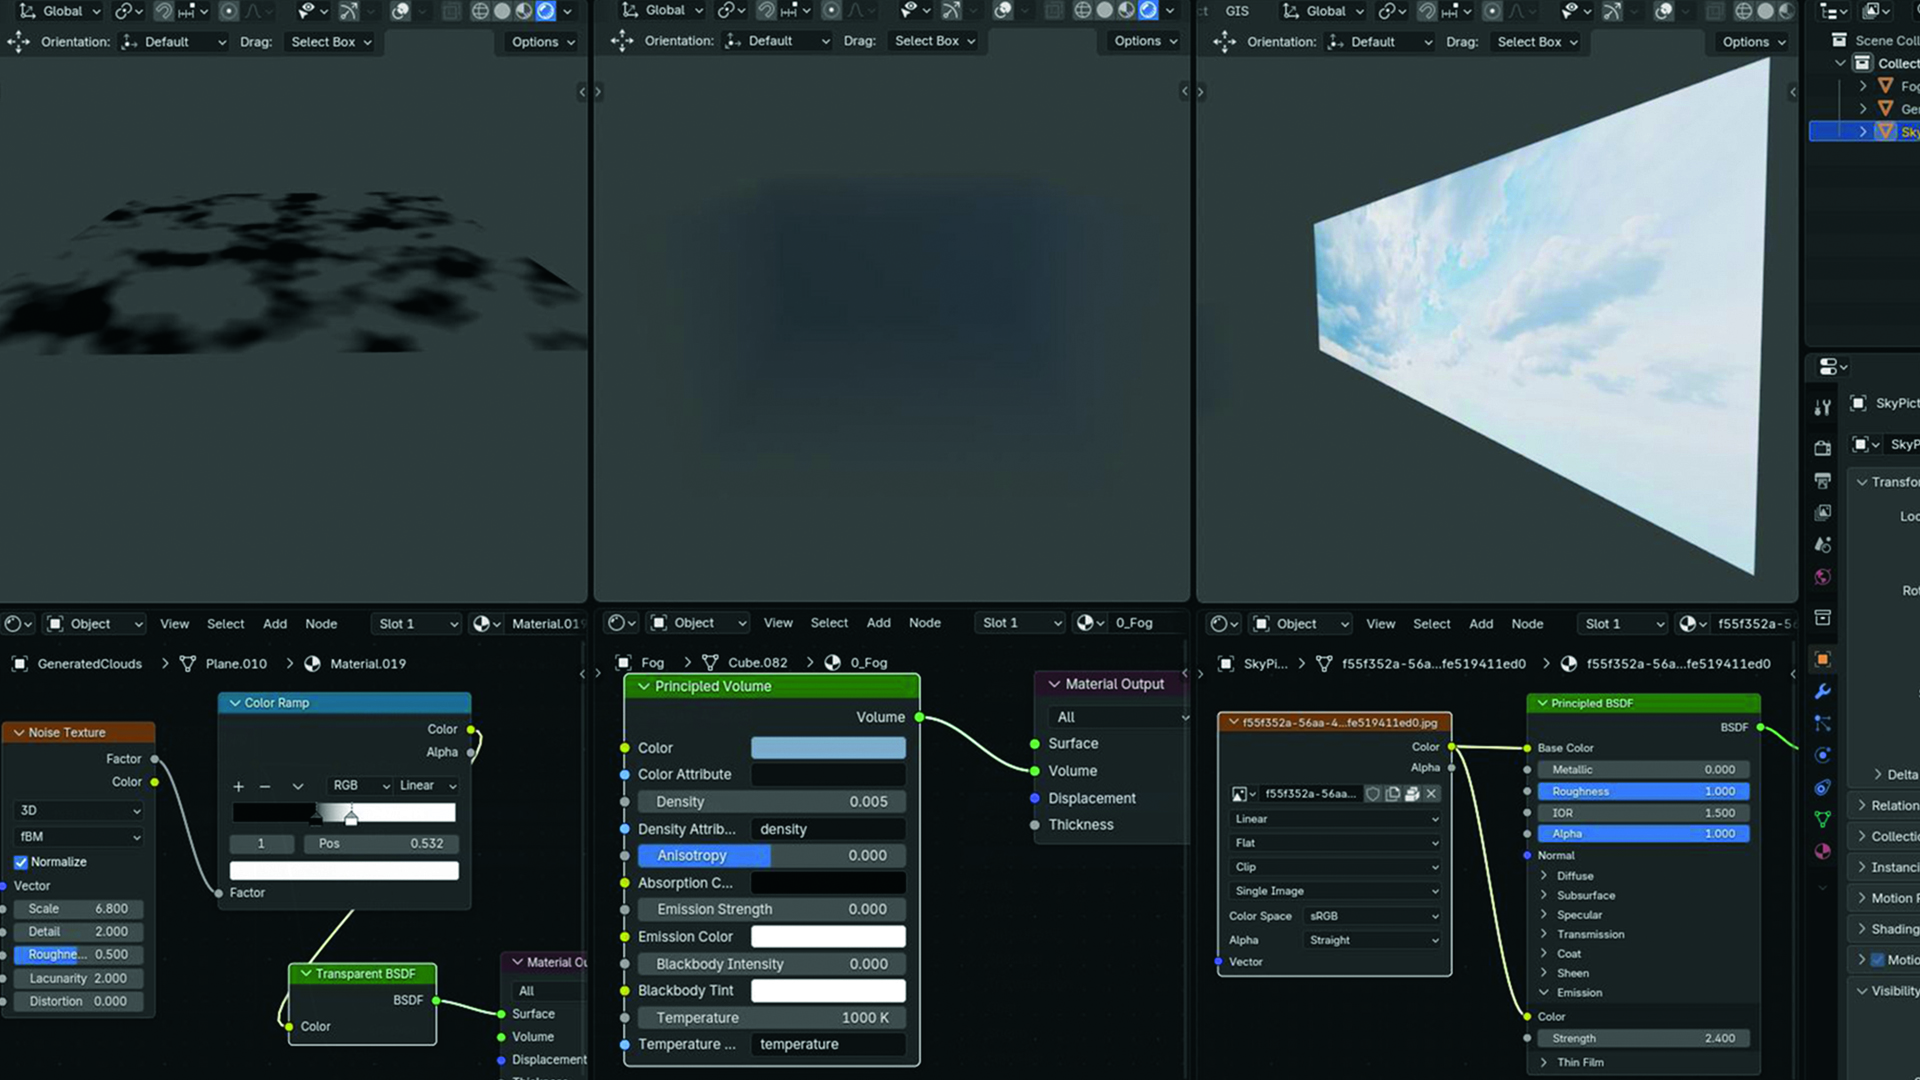
A mixer brush and eraser are then employed to meticulously blend the edges of the photographs, integrating them organically into the scene. This process of photobashing and overpainting is repeated across the illustration, gradually building up detail and enhancing the realism and artistic quality of the final image.
14. Finishing Touches: Achieving Visual Harmony
The final stages involve employing a variety of techniques to enhance the composition and overall readability of the illustration. A fundamental principle to follow is to critically examine the image for any brushstrokes, photographic elements, or rendered areas that lack clarity or are difficult to interpret. The question to ask is: "Is this element essential to the image’s message?" If the answer is affirmative, then further work is required to refine it until its purpose and form are understood.
This meticulous attention to detail ensures that every element contributes to the overarching narrative and aesthetic of the artwork, resulting in a cohesive and impactful final piece.
Implications and Conclusion
This comprehensive workflow, utilizing the free capabilities of Blender and the industry-standard power of Photoshop, demonstrates that achieving professional-quality digital art is accessible to a wide range of artists. By focusing on foundational 3D modeling, strategic texturing, efficient scene assembly, and artistic post-processing, creators can build intricate and immersive worlds. The emphasis on iterative refinement and critical self-assessment throughout the process empowers artists to overcome technical hurdles and develop a unique artistic voice. This approach not only fosters technical proficiency but also cultivates a deeper understanding of composition, lighting, and storytelling, essential elements for any successful digital artist.
This article was originally published in ImagineFX. You can subscribe to ImagineFX to ensure you never miss an issue, with both print and digital subscriptions available.
Creative Bloq is now even more accessible with our dedicated app, offering all the content you love from our website in a streamlined design. Download the Creative Bloq app for iOS and Android.
Sign up to Creative Bloq’s daily newsletter to receive the latest news and inspiration from the worlds of art, design, and technology.