Crafting Ethereal Realms: A Deep Dive into Digital Landscape Creation with Cinema 4D and ZBrush
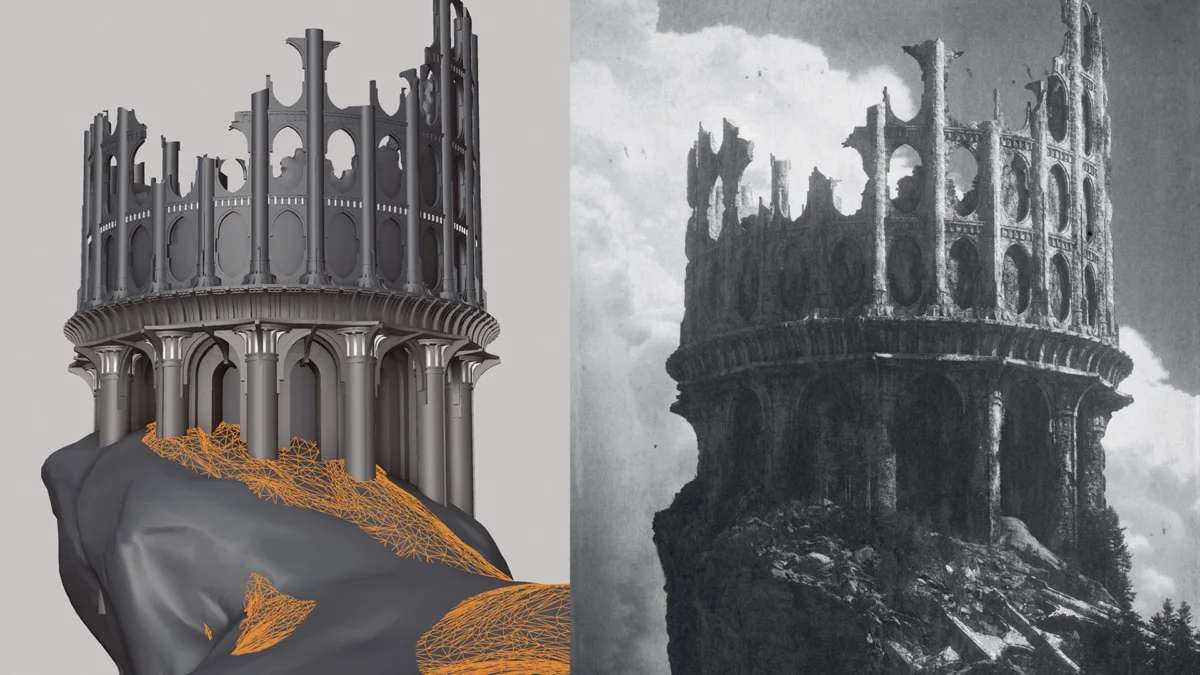
In the realm of digital art, the creation of breathtaking and immersive landscapes is a testament to both technical prowess and artistic vision. This comprehensive tutorial, led by accomplished freelance artist Calder Moore, unveils the intricate process behind constructing a detailed, atmospheric scene, drawing upon a powerful arsenal of industry-standard software including Cinema 4D, ZBrush, Octane Render, and Photoshop. Moore meticulously guides aspiring artists through each stage, from the initial spark of an idea to the final polish of post-production effects, emphasizing efficiency and artistic impact.
The journey begins not with lines of code or polygons, but with the cultivation of inspiration. Moore stresses the importance of building a robust visual palette by gathering reference imagery that captures the essence of architecture, environment, lighting, composition, and mood. This foundational step ensures that the nascent scene possesses a clear artistic direction and emotional resonance. For complex natural environments, Moore advocates for pre-production in 3D, meticulously building a library of reusable assets, such as sophisticated foliage scatter systems and versatile materials. This proactive approach liberates the artist from repetitive technical tasks, allowing them to focus on the creative aspects of scene construction.
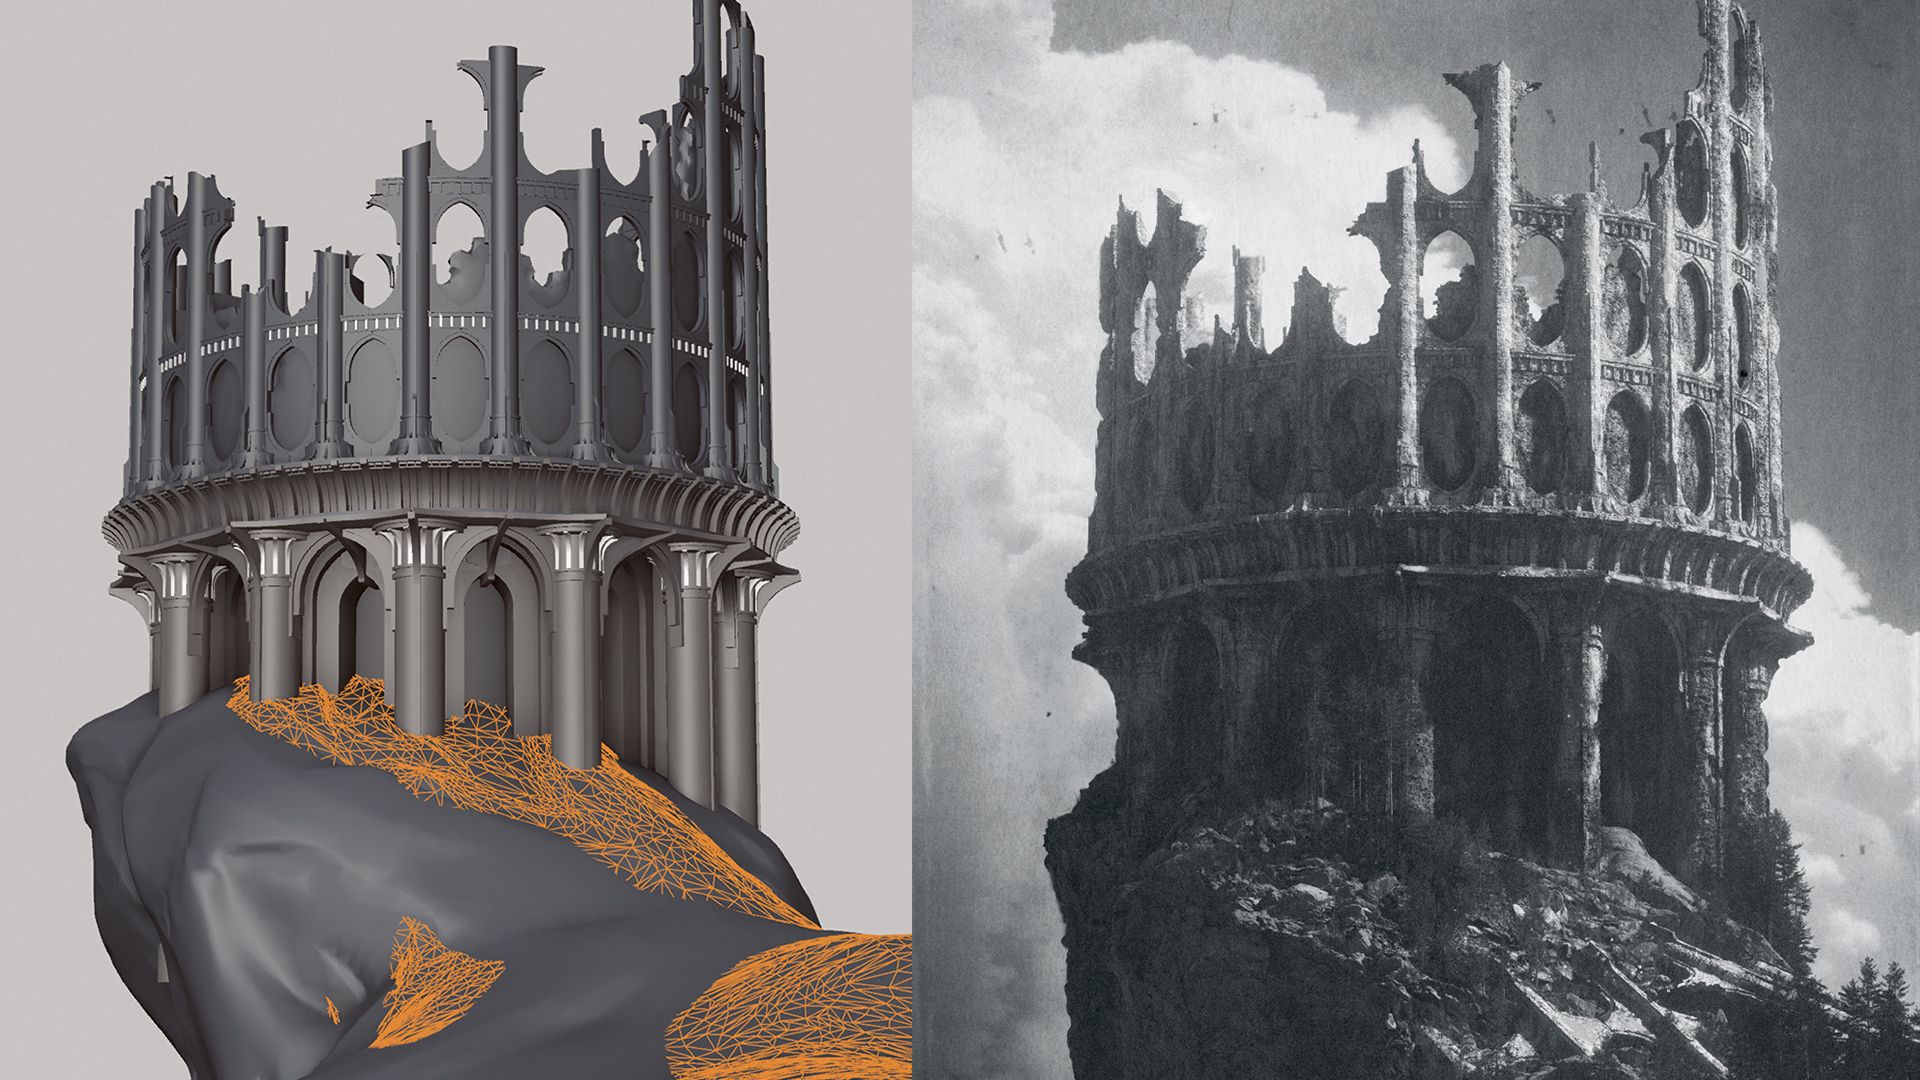
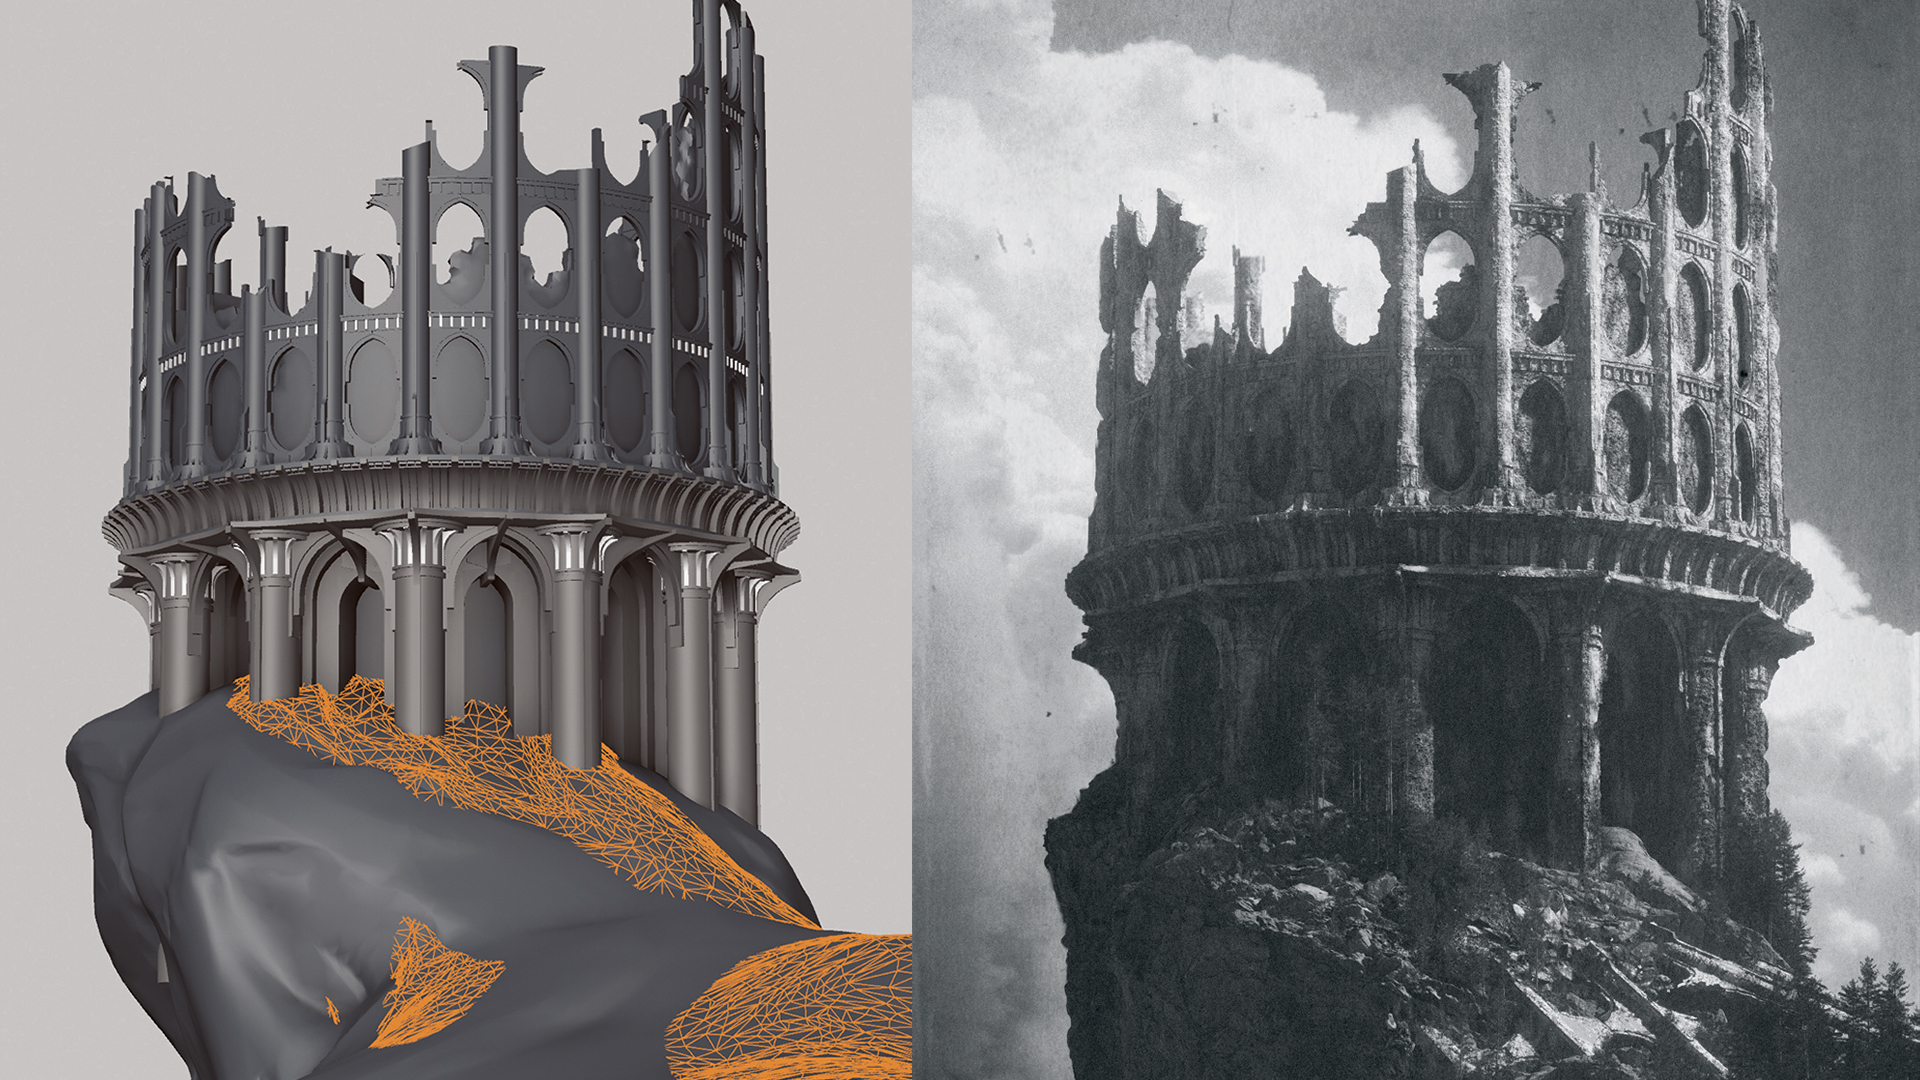
A fascinating anecdote shared by Moore reveals the serendipitous evolution of the featured scene. Initially conceived in full color, a decision to reduce saturation during the lighting phase to better assess values unexpectedly ignited a new artistic direction. The resulting monochromatic aesthetic, deemed more evocative of the desired "video-like" mood, was embraced, demonstrating the power of experimentation and the emergent nature of artistic discovery.
Moore also offers a pragmatic approach to managing the inherent complexity of large-scale digital projects. The key, he suggests, lies in deconstructing seemingly daunting tasks into smaller, more manageable components. By meticulously listing every necessary action – from "make tower" and "break tower" to "detail ground" and "add foliage" – the artist transforms an overwhelming undertaking into a series of achievable steps, fostering a sense of progress and preventing creative burnout.
The Genesis of a Digital World: From Sketch to Scene
The artistic process, as outlined by Moore, unfolds in a structured yet adaptable sequence, beginning with the conceptualization of the scene’s core elements.
01. Forging the Vision: The Power of the Thumbnail Sketch
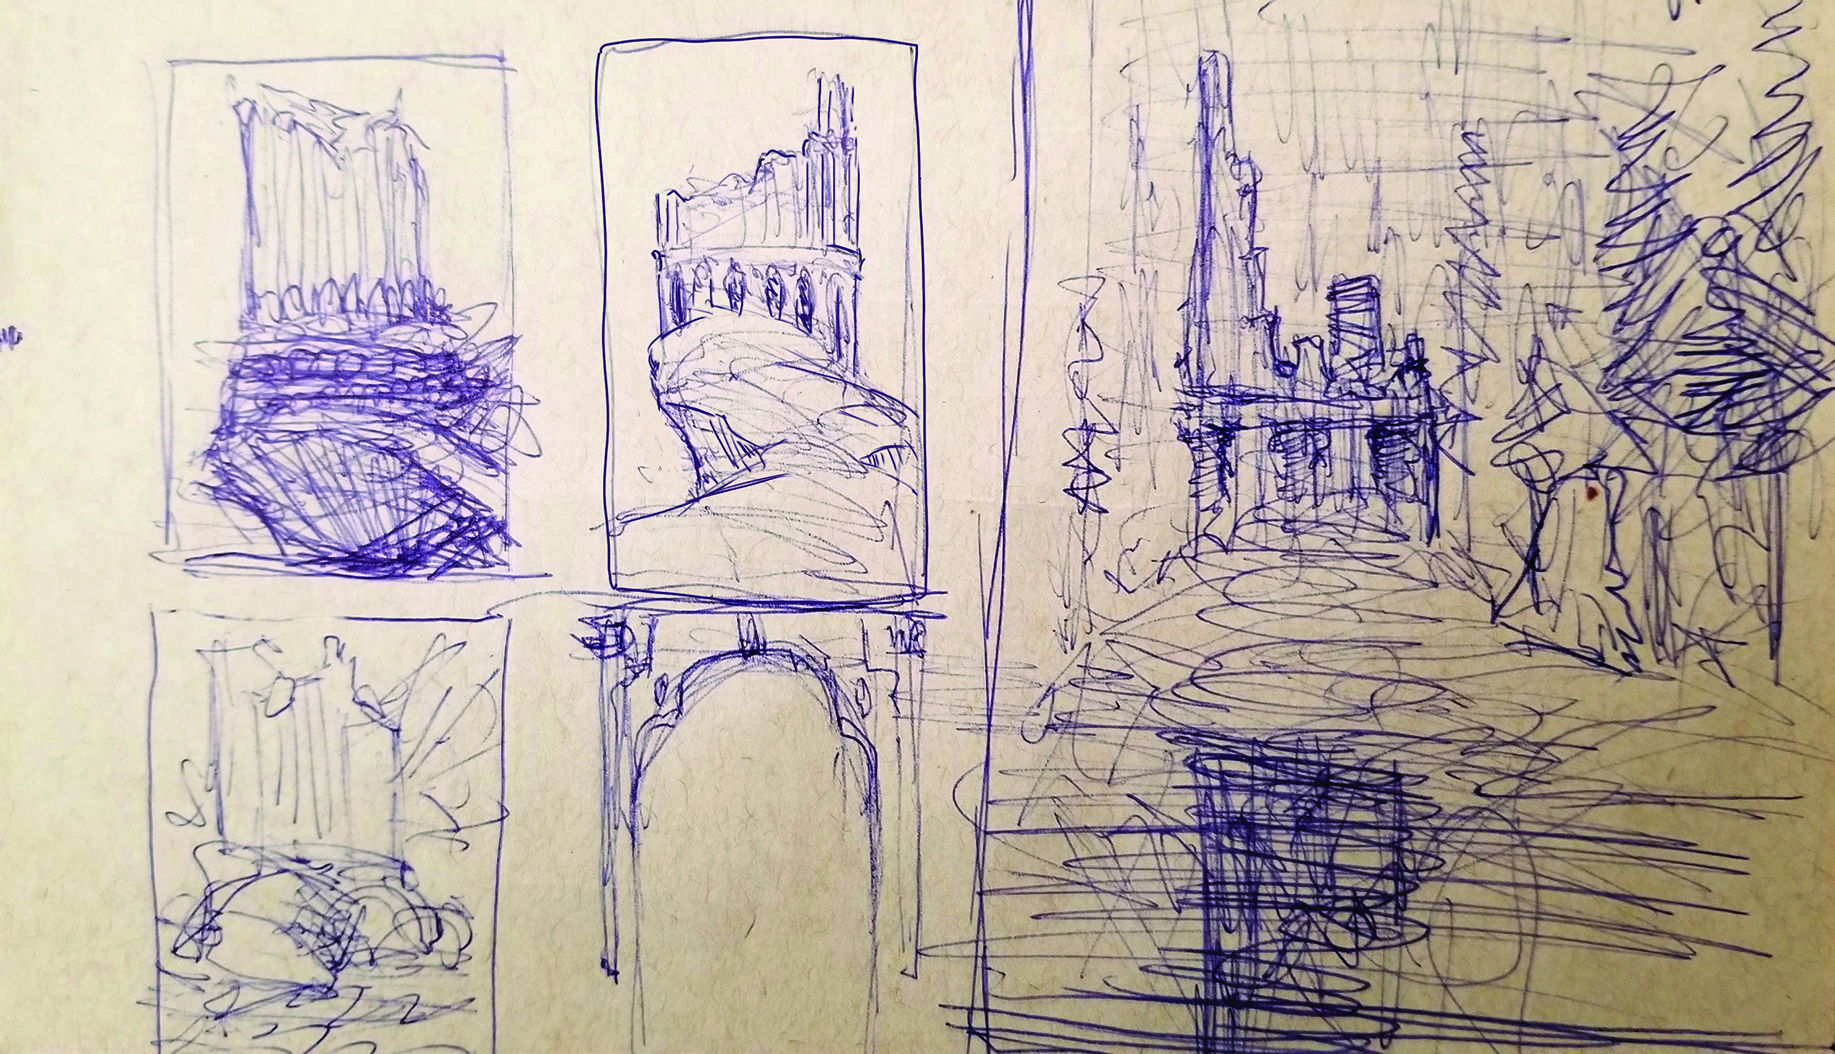
Moore invariably initiates the creative process with a series of small, quick thumbnail sketches. This crucial preliminary step allows for rapid iteration of various compositional ideas, facilitating the exploration of different visual narratives and the establishment of the scene’s overall flow and atmosphere. In the case of the featured landscape, the objective was to evoke a sense of "lonely, forgotten ancient power" embodied by an epic, solitary tower. These initial sketches serve as a visual blueprint, guiding the subsequent translation into three-dimensional space.
02. Laying the Foundation: Blocking Out the 3D Scene
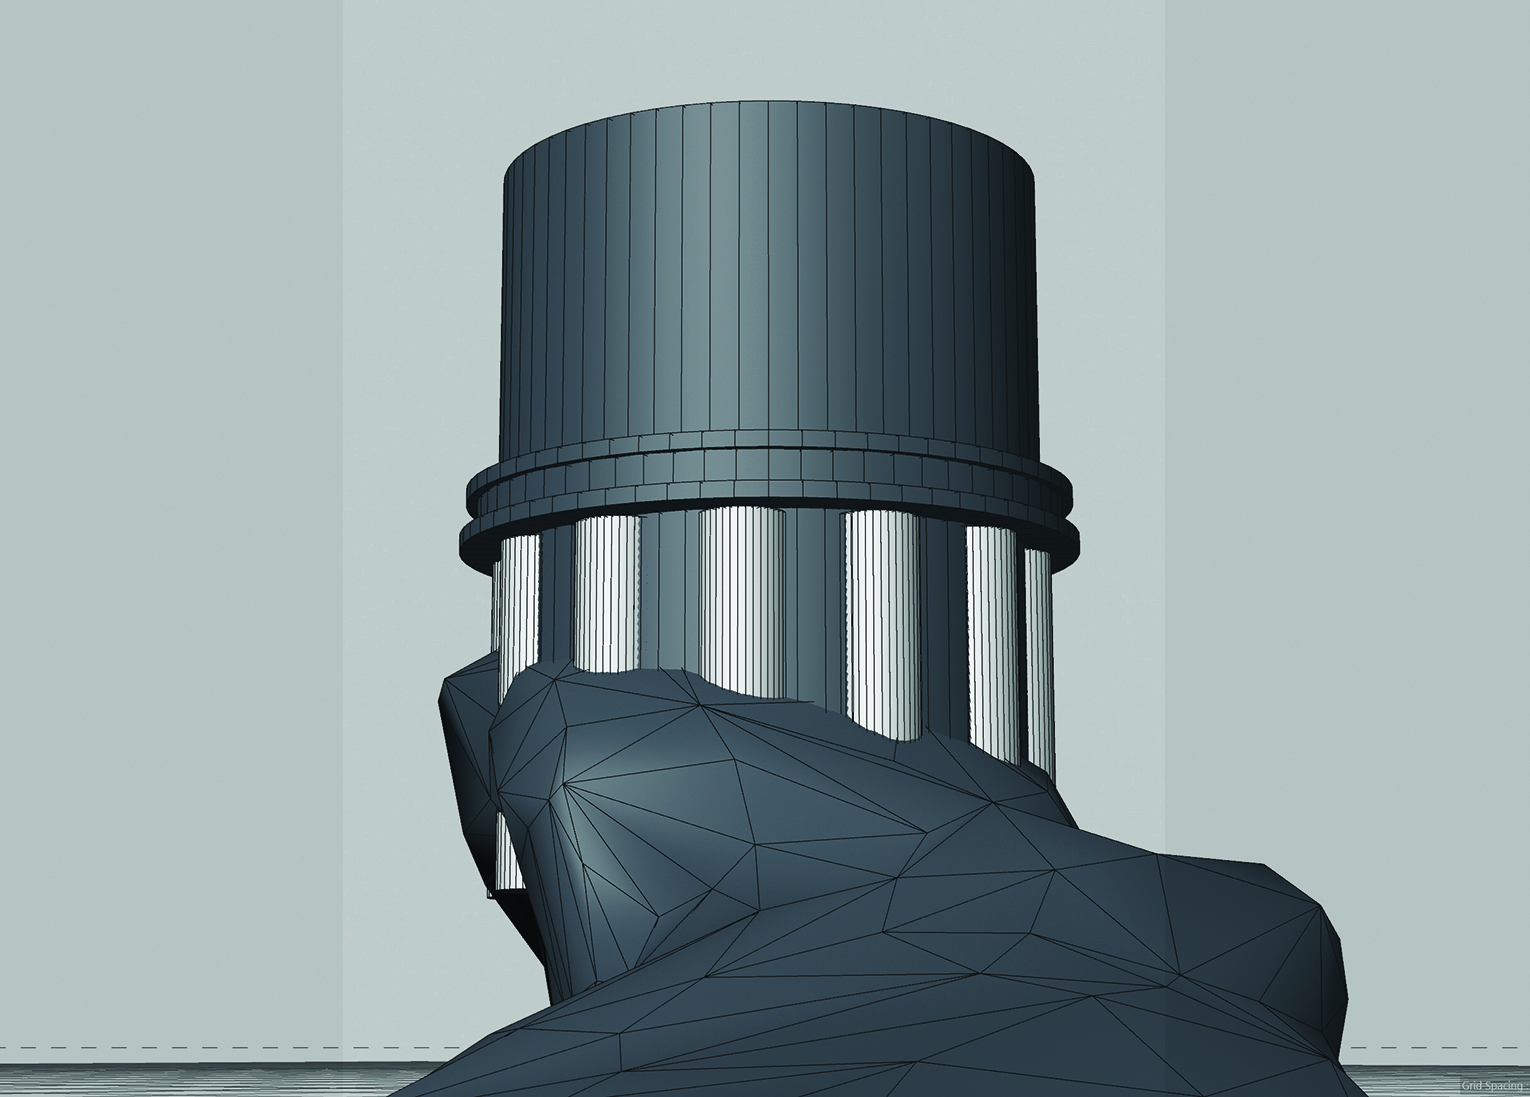
With a clear compositional direction established through sketching, the next phase involves translating these concepts into a tangible 3D environment within Cinema 4D. Moore employs basic geometric primitives and intuitive sculpting tools to construct the foundational forms of the landscape and define the silhouette of the central tower. A pivotal aspect of this stage is the early and firm establishment of the camera position. Locking down the camera perspective early on allows the artist to refine the scene with the final shot in mind, ensuring that all subsequent design decisions contribute to the intended visual impact. This disciplined approach prevents wasted effort on elements that may not be visible in the final render.
03. Architectural Ascent: Constructing the Tower
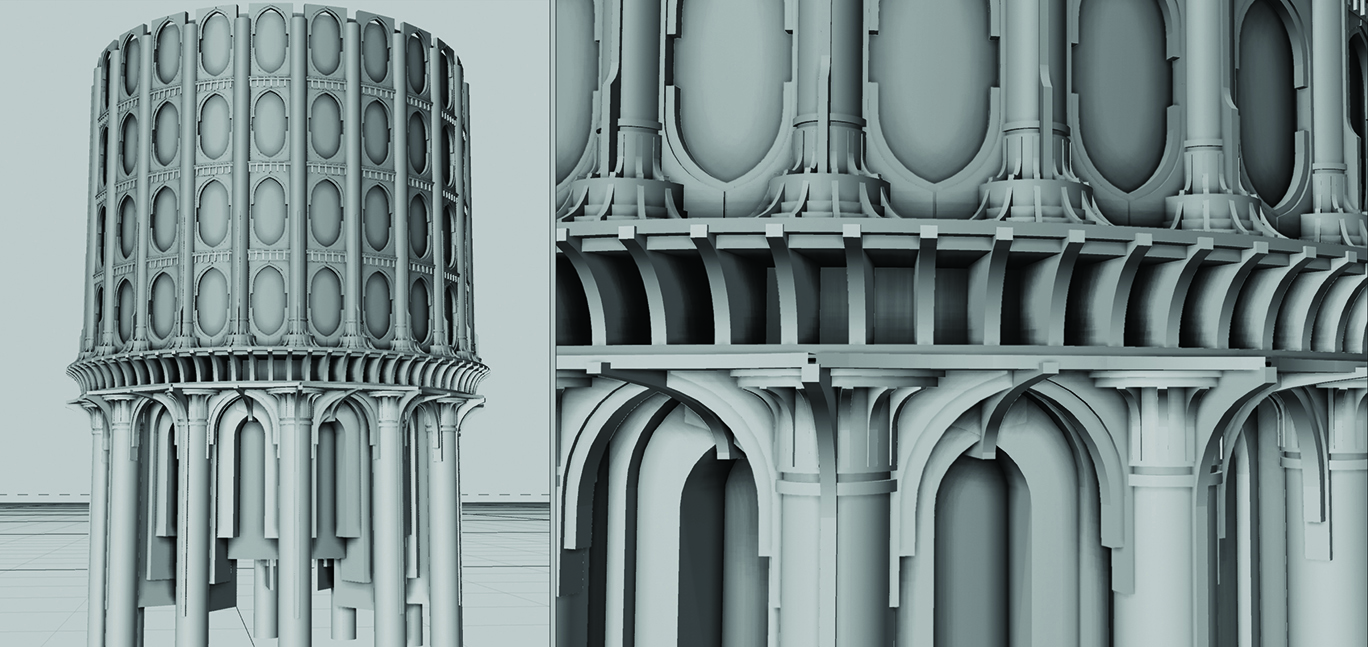
Once the scene’s basic structure is in place, Moore focuses on developing the more intricate elements, beginning with the tower. To achieve a high level of detail efficiently, he leverages displacement textures, which allow for the addition of complex surface variations without the need for excessive polygon subdivision. For architectural elements such as archways, symmetry tools are employed, while radial cloners are utilized to create repeating structural components like pillars. This method of procedural generation and detail application ensures consistency and allows for rapid iteration on the tower’s design. The overall form of the tower is then assembled through the application of these detailed modules.
04. The Weight of Time: Deconstructing the Tower
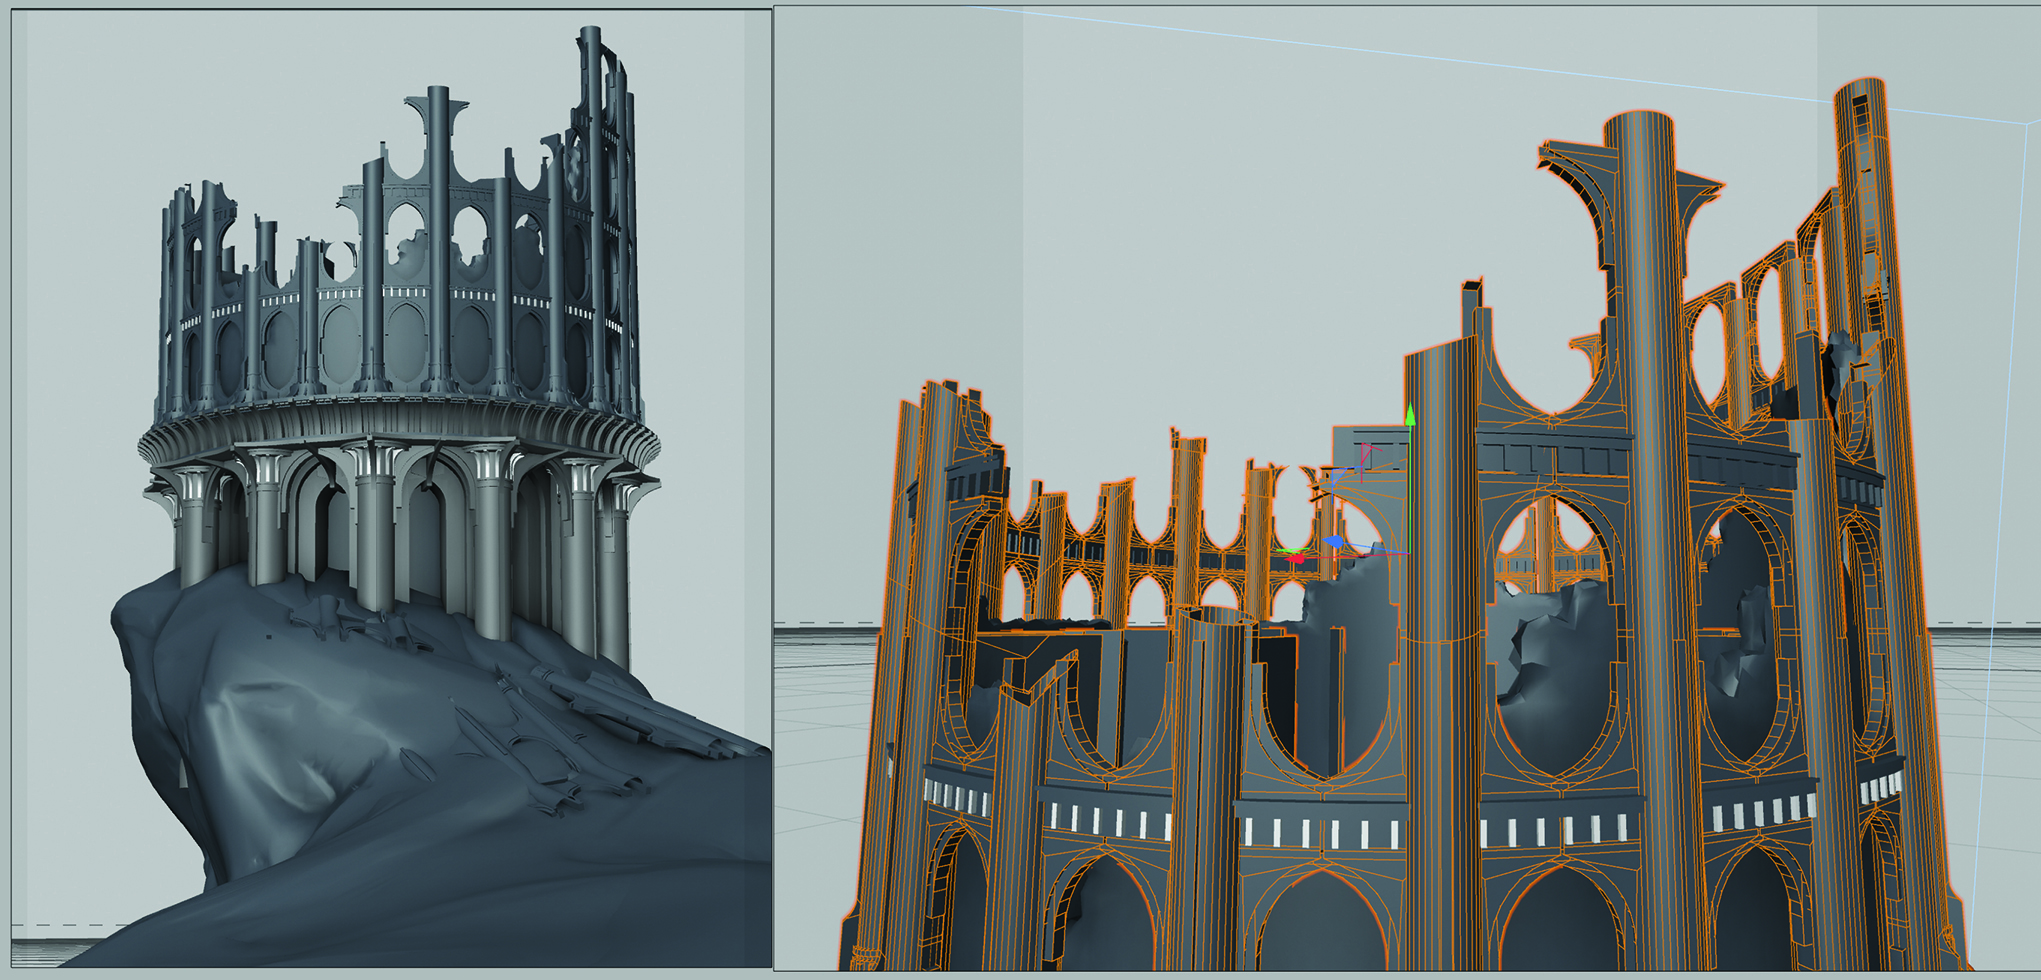
The narrative of the scene is further enriched by the depiction of decay and ruin. Moore masterfully "destroys" the meticulously constructed tower through a series of deliberate fracturing and erosion techniques. Utilizing tools such as the knife tool and the voronoi fracture effect, he introduces cuts and fissures into the tower’s geometry. Guided by the initial sketch, specific portions of the geometry are then selectively removed, simulating a natural collapse. This process is not arbitrary; Moore emphasizes the importance of spending adequate time to ensure that the damage appears organic and believable, contributing to the overall narrative of a long-forgotten structure succumbing to the passage of time.
05. Sculpting the Earth: Detailing the Terrain
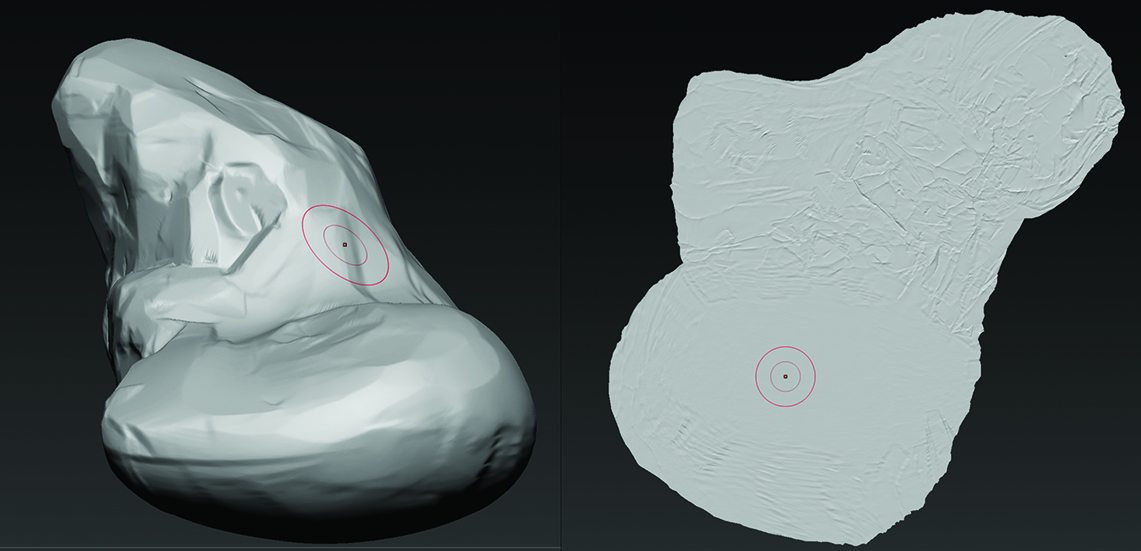
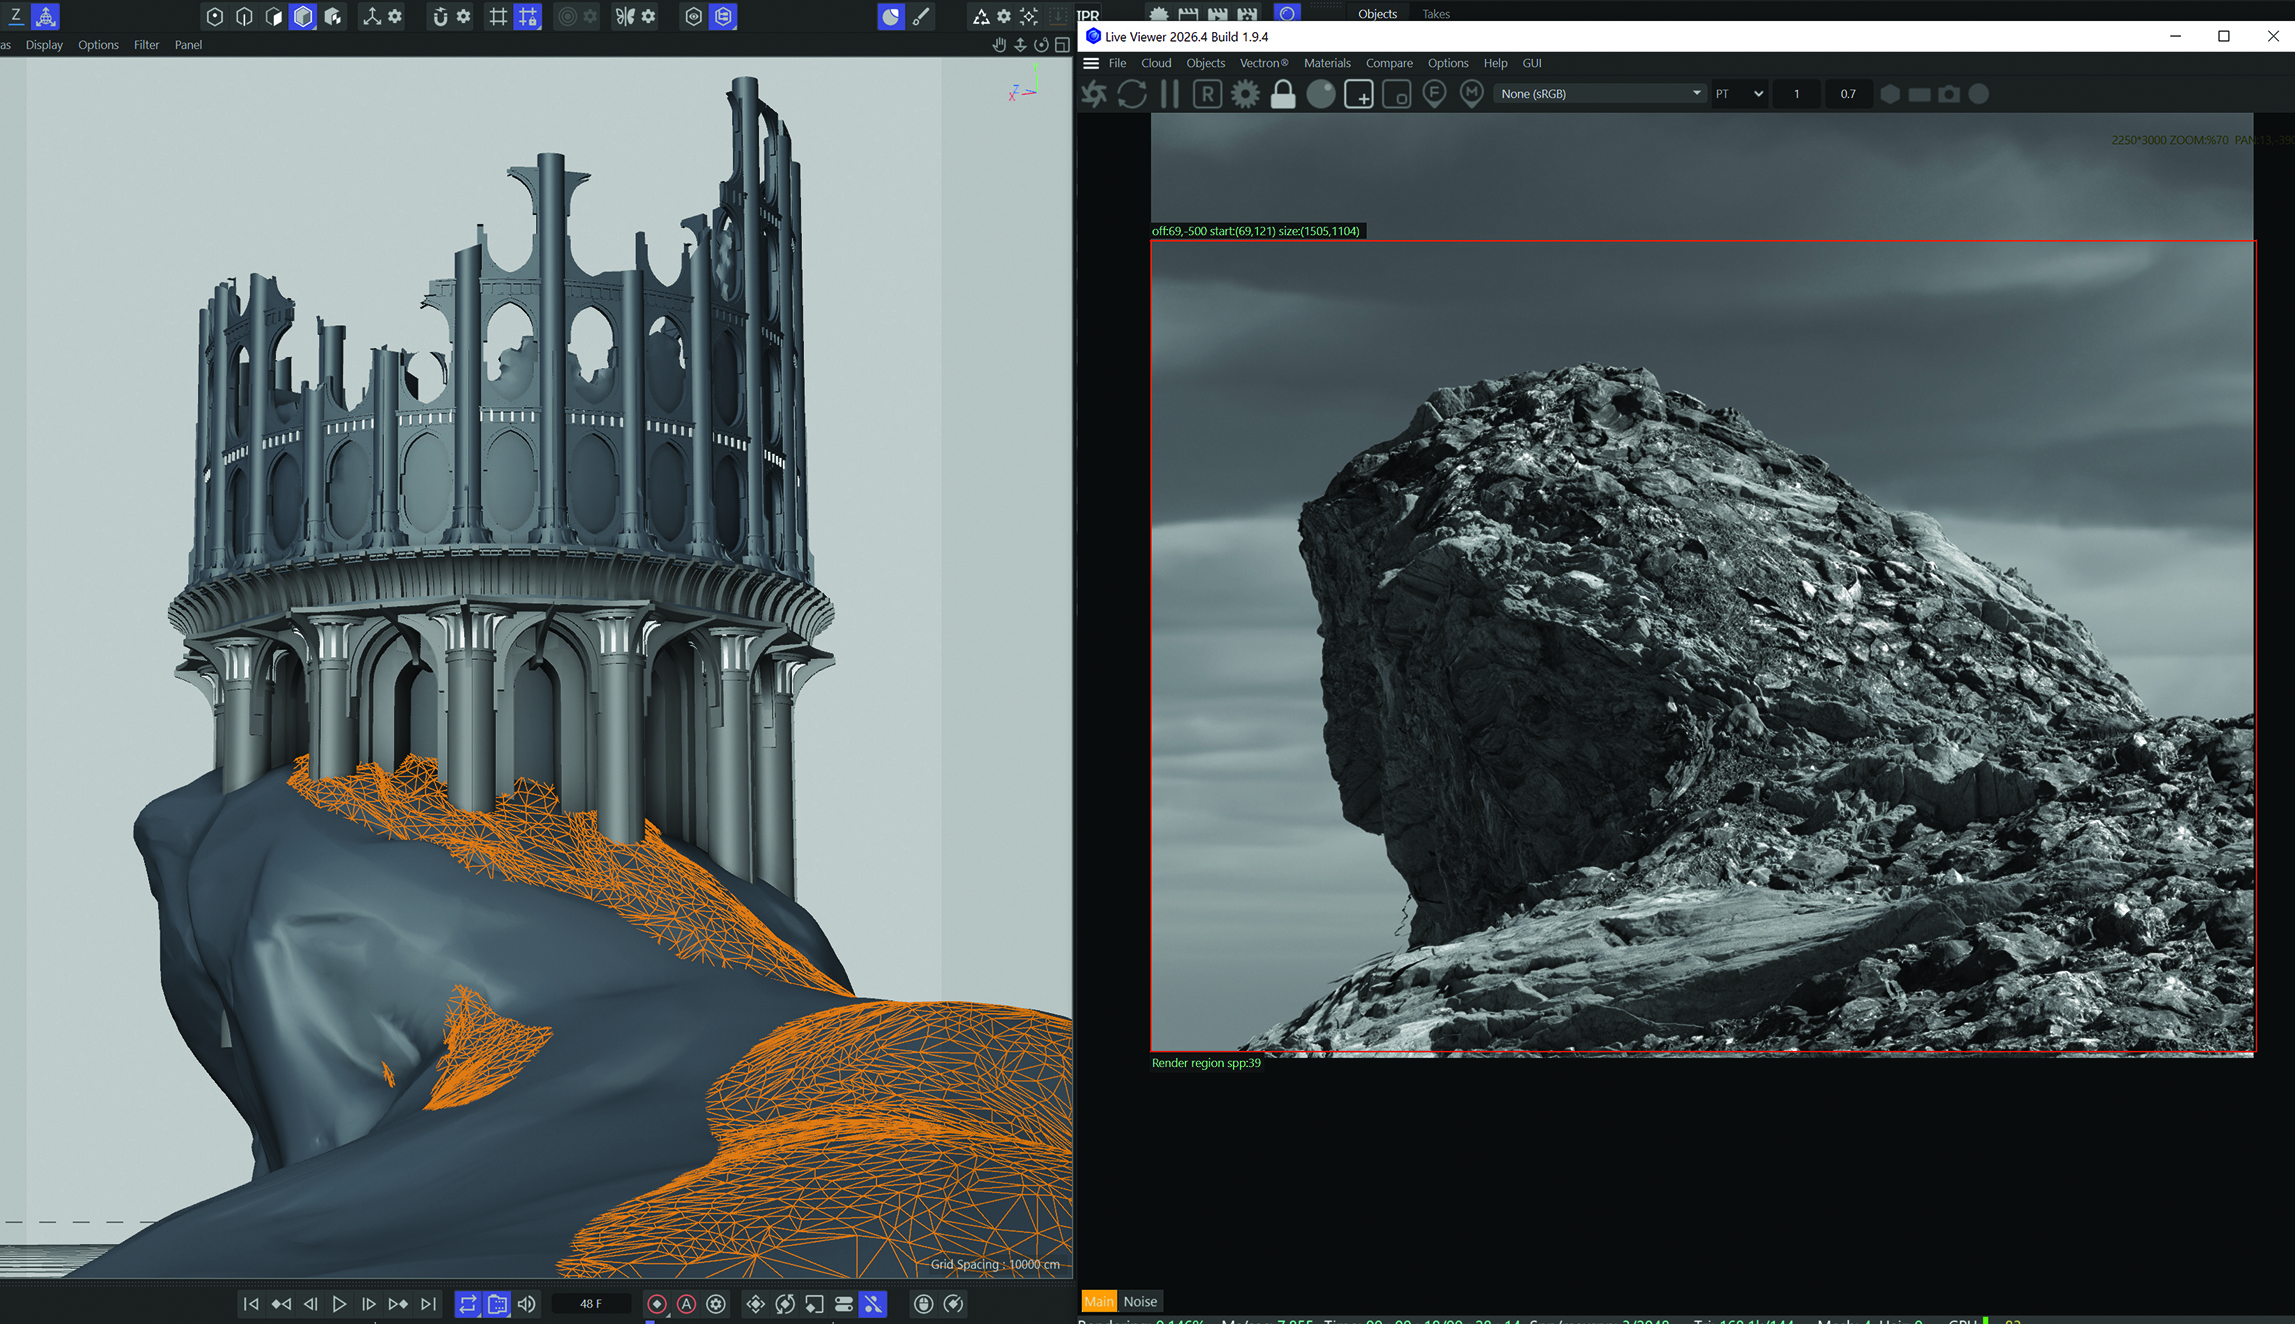
With the primary architectural element in place and showing signs of age, attention shifts to the surrounding terrain. The basic landscape geometry is exported and imported into ZBrush, a powerful digital sculpting application. Here, Moore refines the broader forms of the terrain, focusing on the larger shapes and contours. Displacement textures are applied to the terrain, with a deliberate emphasis on keeping the fine details minimal at this stage, as these will be amplified later. Crucially, quick UV (ultraviolet) unwrapping is performed on the terrain mesh. This step is vital to prevent rendering artifacts that can arise from displacement mapping on poorly unwrapped geometry. The refined terrain is then exported back to Cinema 4D, ready for further development.
06. Textural Depth: Imbuing the Terrain with Materiality
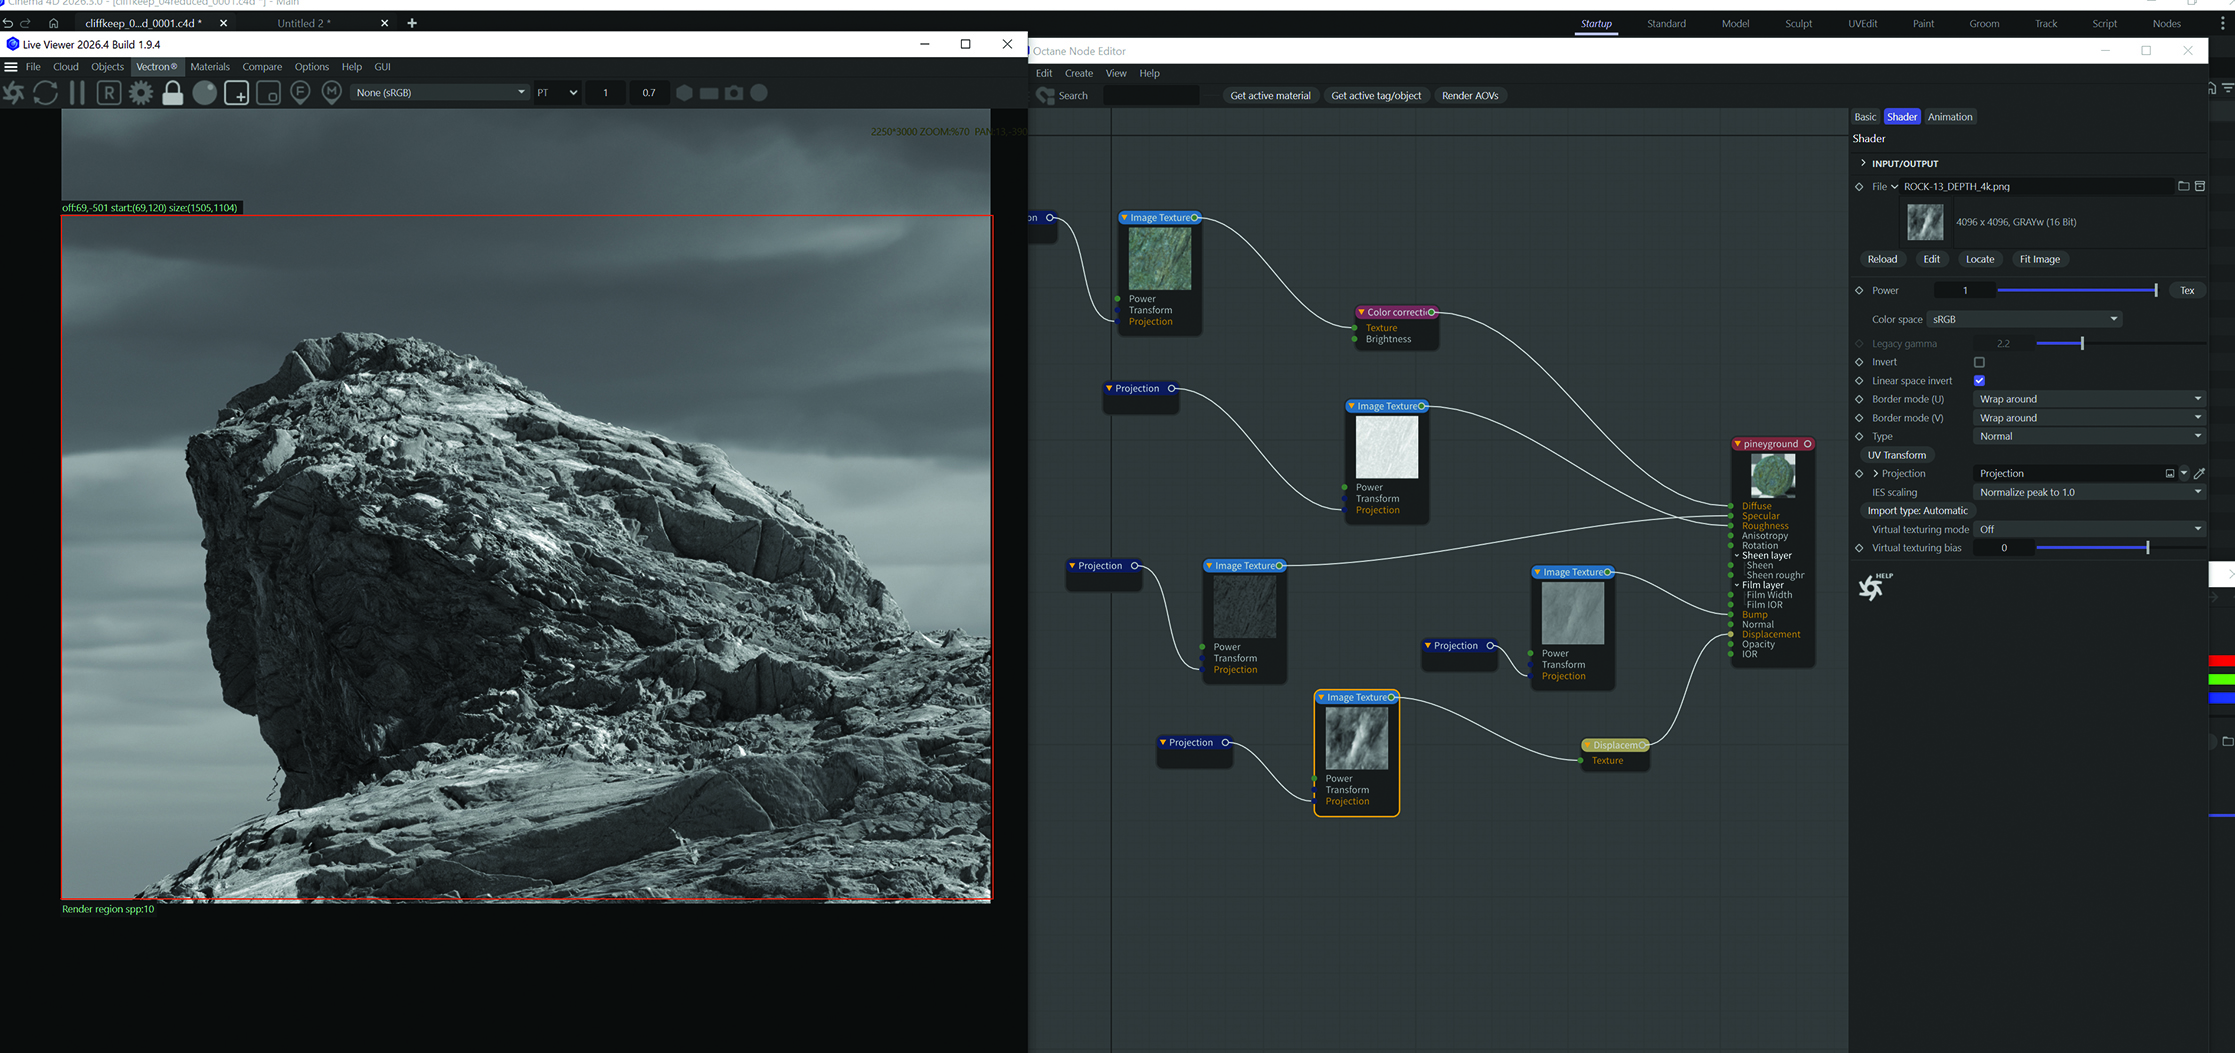
The sculpted terrain, now back in Cinema 4D, begins to take on a more tangible form through the application of materials. Moore employs a high-quality, tileable photoscanned rock material, sourced from platforms like RD Textures (now part of Megascans). By significantly increasing the displacement scale of this material, he imbues the relatively simple sculpted geometry with a remarkable level of complexity and visual depth. Careful adjustment of the scale and UV offset parameters allows for the creation of an aesthetically pleasing and naturalistic rock formation, defining the ground’s character.
07. Layering Realism: Adding Nuance to the Terrain
While the initial terrain texturing provides a solid foundation, a single material can sometimes lack the natural variation found in real-world landscapes. To address this, Moore employs a clever layering technique. The existing terrain geometry is duplicated, slightly elevated, and then strategically sculpted downwards in certain areas. This allows for the application of a different material – a rocky ground texture rather than a cliff face – creating a natural blend between distinct surface types. The visual effect, evident in the render, is a seamless transition between different geological elements, enhancing the scene’s realism and depth.
08. The Stone’s Story: Texturing the Tower
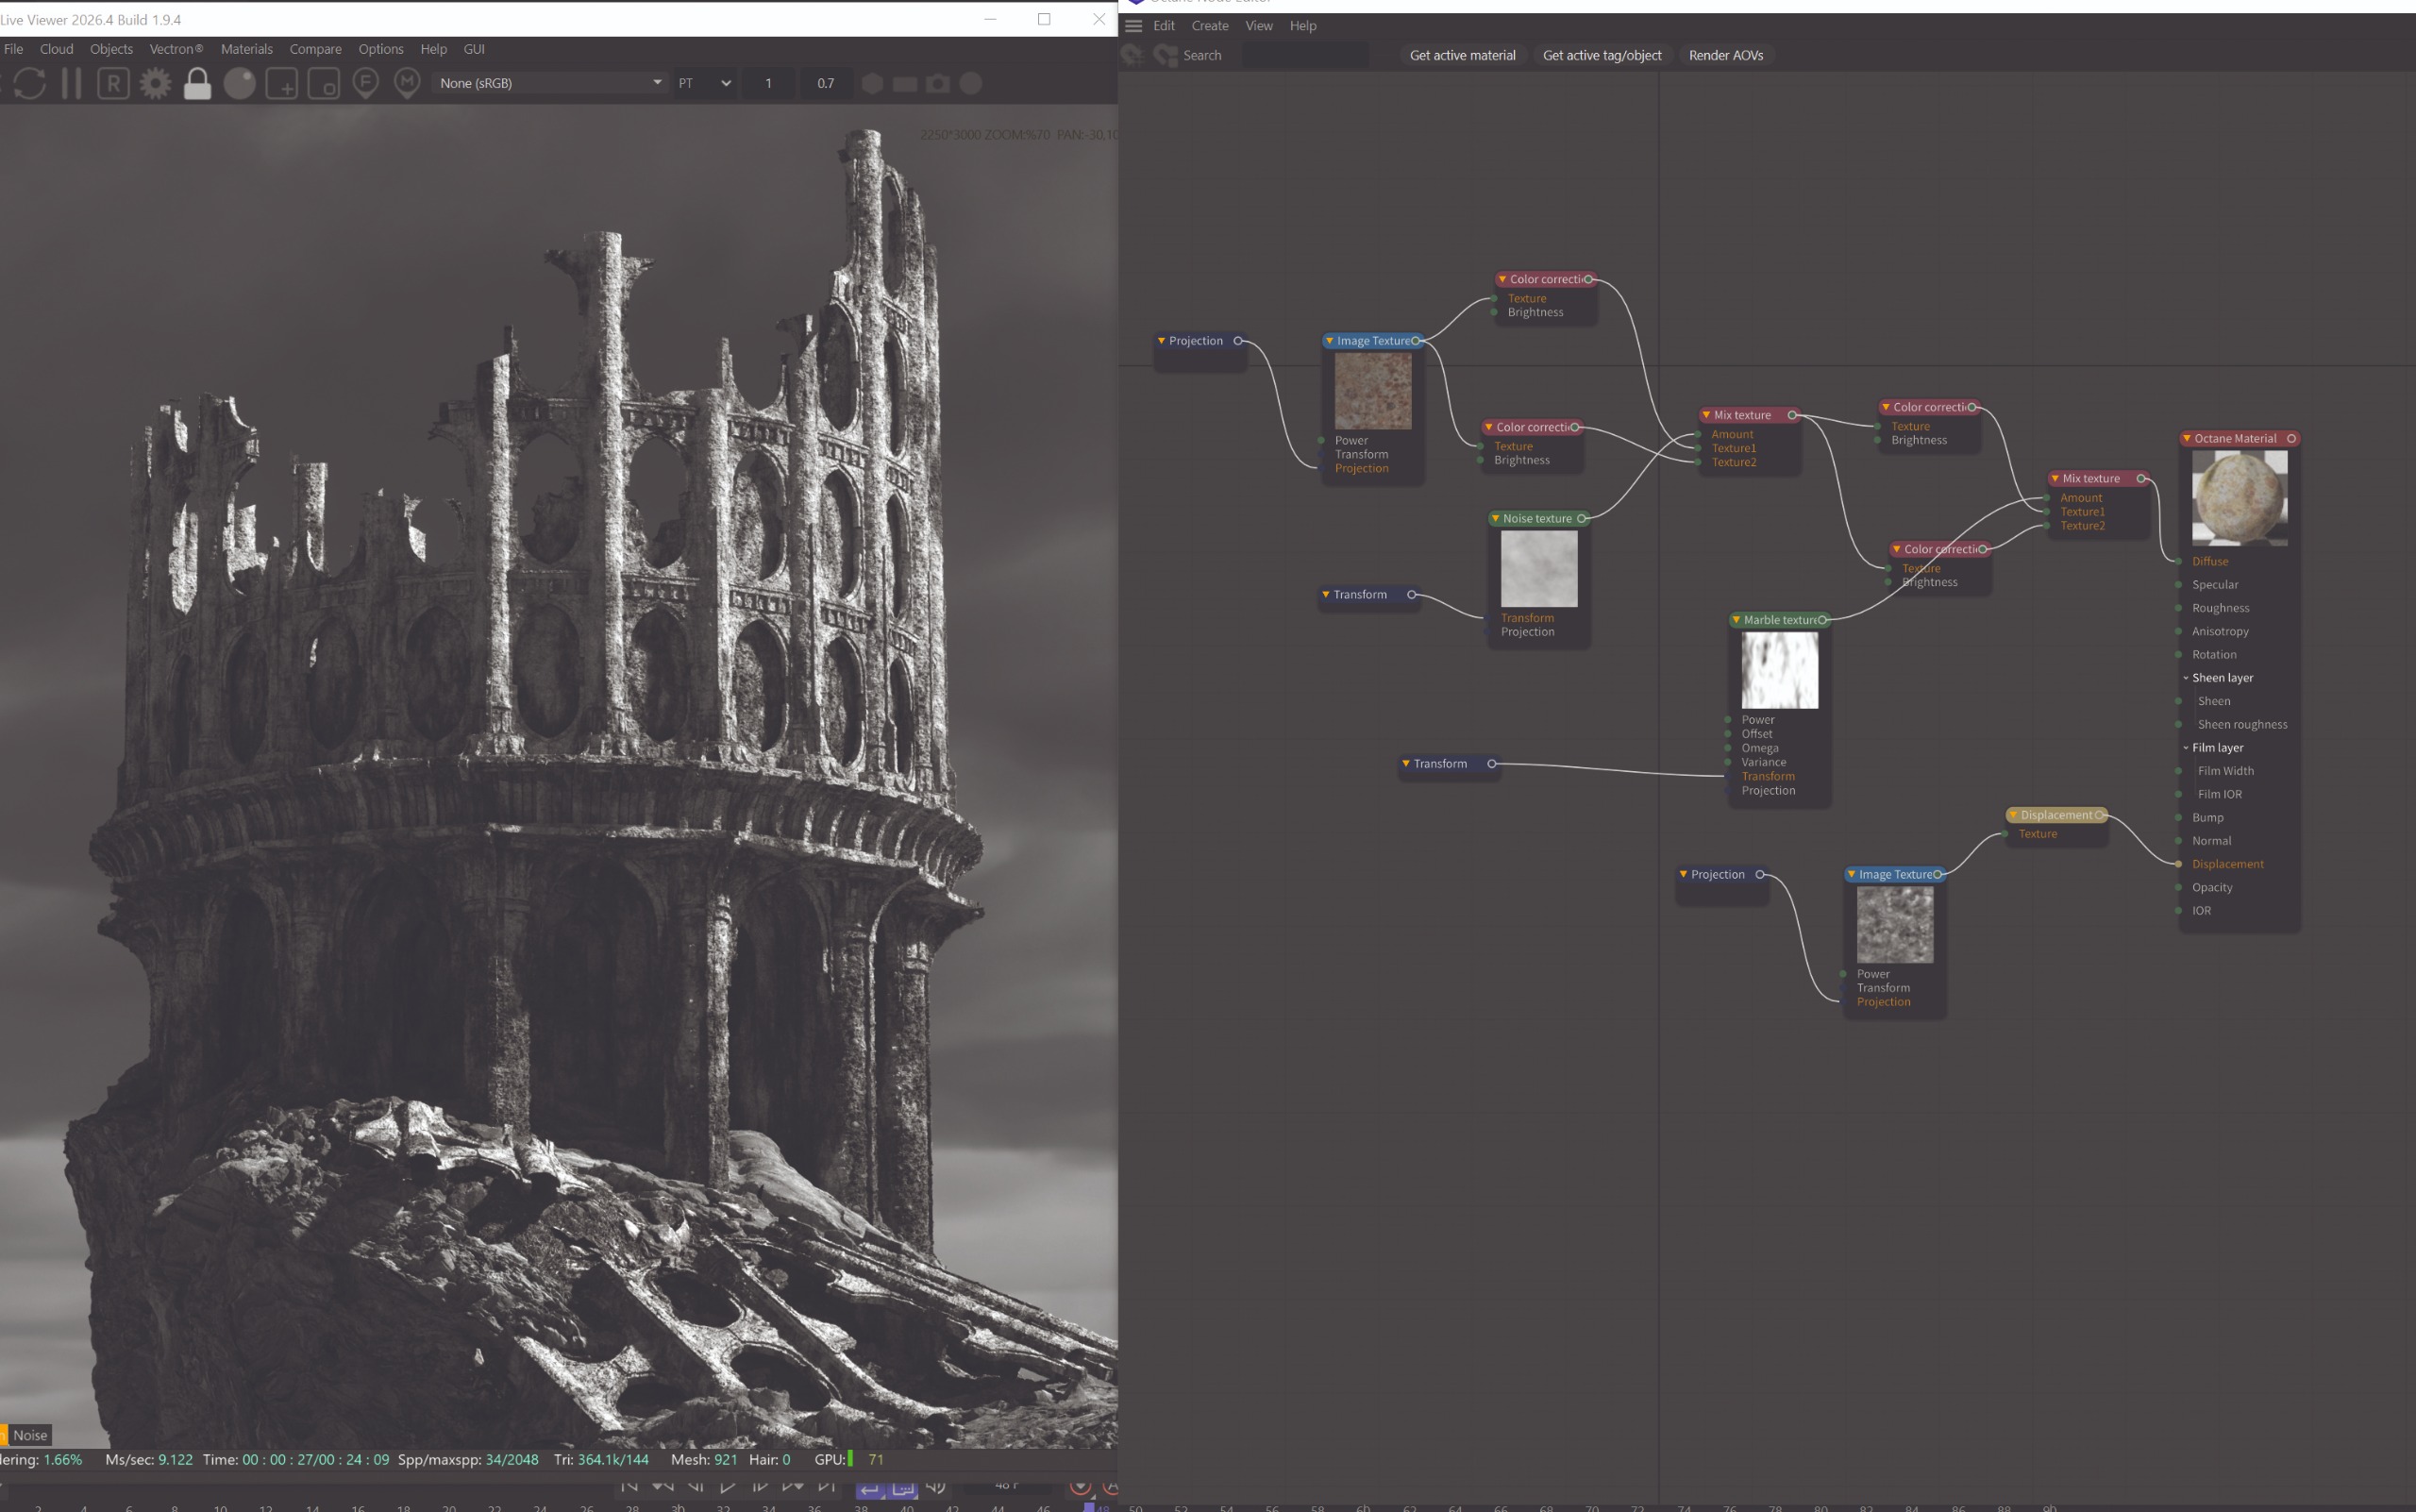
The tower, having been sculpted and fractured, now requires a compelling surface treatment. Moore begins by creating a fundamental stone wall material, again incorporating displacement for added realism. This base material provides the essential texture and form. To prevent the appearance of a uniform, tiled surface, he introduces a secondary noise material. This material is designed to darken specific areas, simulating grime and wear. The integration of these two materials is achieved through a gradient marble texture, strategically applied to ensure that the grime accumulates more heavily towards the base of the tower, a natural consequence of environmental weathering.
09. Illuminating the Atmosphere: Lighting and Sky Integration
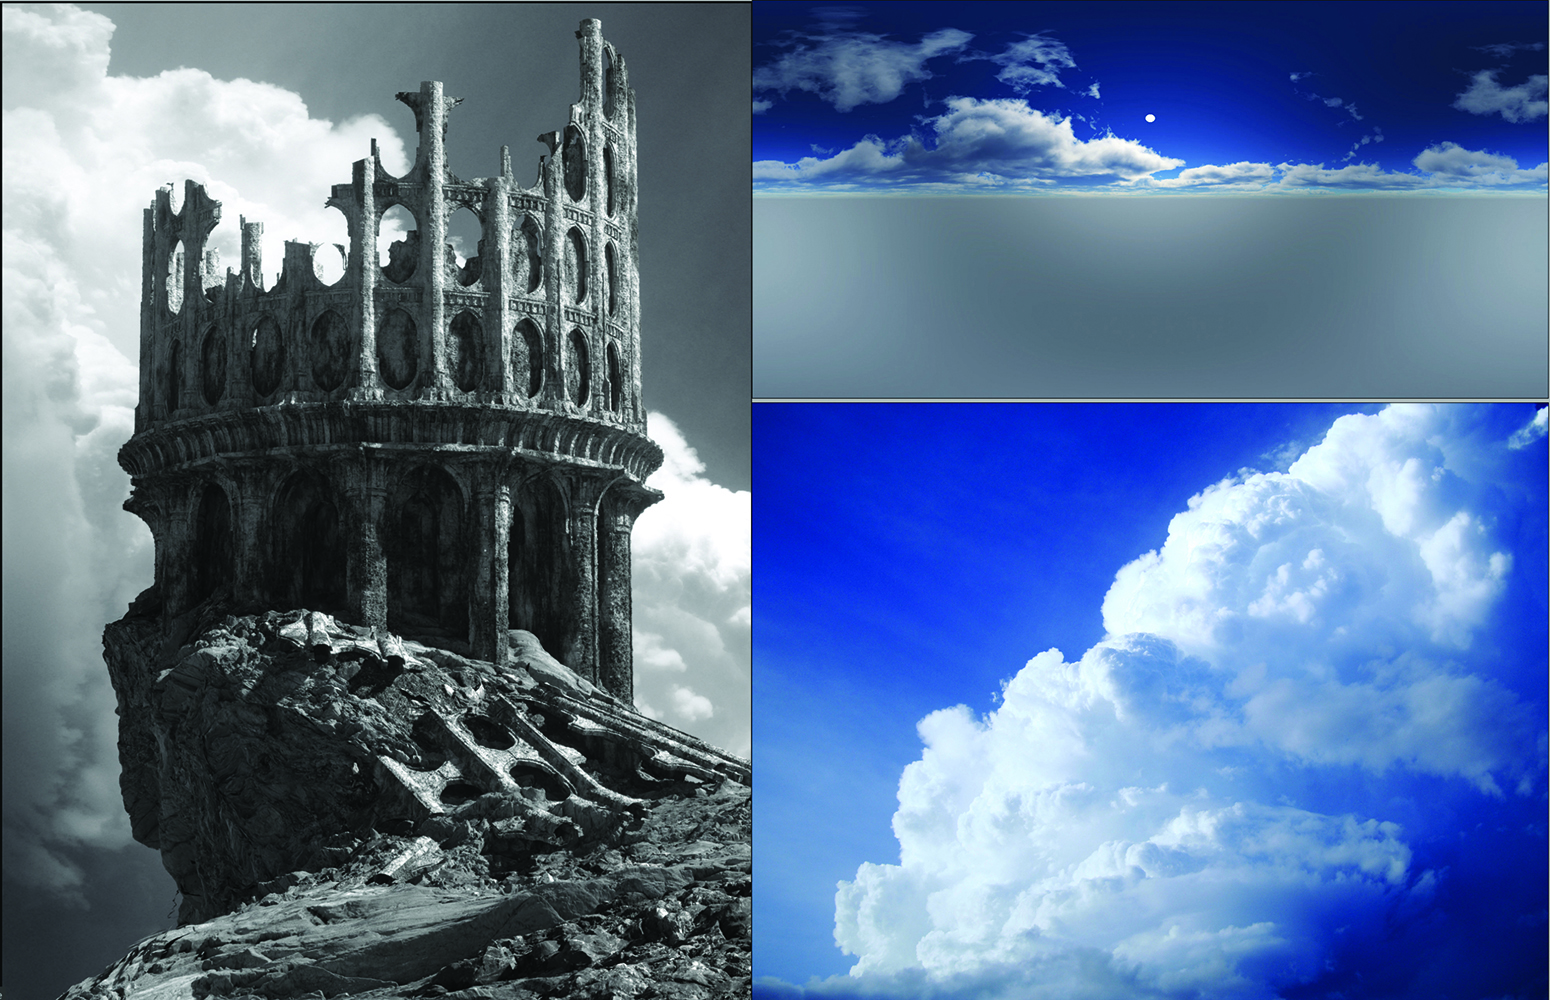
The process of lighting and sky integration is often conducted in parallel with the texturing stages, as these elements profoundly influence the overall mood and perception of the scene. Moore experiments with various High Dynamic Range (HDR) images to establish a lighting scheme that perfectly complements the desired atmosphere. The camera composition is further refined during this phase, with a deliberate focus on the interplay of light and shadow. This strategic use of illumination is crucial for creating strong contrast, enhancing readability, and generating compelling visual interest, drawing the viewer’s eye through the scene. To further enhance the compositional flow and add a sense of atmospheric depth, a cloud plane is strategically introduced into the scene.
10. Embracing Nature: Populating the Landscape with Foliage
With the core elements of the scene established, Moore introduces the organic elements that bring the landscape to life. He utilizes pre-prepared Octane Scatter systems, which are optimized for efficiently distributing a variety of natural elements such as trees, shrubs, grasses, and smaller plants. The terrain geometry serves as the canvas for this distribution. A vertex map is painted onto the terrain, acting as a guide for the scatter systems, dictating precisely where and how densely the foliage should be generated. In this particular scene, a curated selection of pine trees, shrubs, and grasses were strategically placed to create a natural and believable environment.
11. The Final Render: Capturing the Scene in its Full Glory
The penultimate step within the 3D environment involves rendering the finalized scene. For complex natural scenes, Moore advocates for rendering in manageable sections. This approach allows for faster previewing of results and iterative adjustments. During this phase, the primary focus is on optimizing render settings and scene performance to achieve a high-quality render in a reasonable timeframe. In addition to fine-tuning the scene’s visual elements, Moore renders out crucial auxiliary passes. These include a Z-depth pass, which captures depth information for post-processing effects, a bloom pass to simulate light diffusion, and an object ID pass for precise element selection in Photoshop.
Post-Production Alchemy: Refining the Digital Canvas
The raw render, while impressive, is merely the starting point for the final artistic refinement. Moore’s expertise in Photoshop transforms the rendered output into a polished masterpiece.
12. The Photoshop Touch: Initial Adjustments and Artifact Correction
Upon importing the rendered elements into Photoshop, Moore begins the meticulous process of refinement. The initial focus is on addressing any visual artifacts that may have arisen from the displacement mapping or other rendering processes. Using basic brushes, he meticulously paints over these imperfections, smoothing out any visual noise and ensuring a clean and cohesive final image. For this specific scene, a key objective was to achieve an "old photo" aesthetic. This was accomplished by carefully adjusting the levels and exposure to deepen the blacks, fine-tuning the background values, and integrating the bloom pass to create a subtle glow.
13. Detailing and Depth: Enhancing the Narrative through Painting
A closer examination of the scene reveals the intricate details added during the Photoshop phase. Moore demonstrates how he takes the base rendered geometry and overlays painted details to eliminate geometric artifacts, refine visual noise, and introduce subtle elements like brick details within the tower’s silhouette. Furthermore, a deliberate blur is applied to the background elements of the tower. This strategic application of depth of field not only enhances the readability of the foreground elements but also contributes to a more immersive and less "flat" visual experience, mimicking the way the human eye perceives depth in the real world.
14. The Final Flourish: Layering Effects and Achieving Cinematic Appeal
The final touches are applied through the strategic layering of textures and effects. Moore introduces old photo and paper textures, blending them into the scene using layer styles such as "vivid light" and "multiply." Experimentation with these layer styles is crucial to finding the perfect aesthetic. Finally, a last-minute levels adjustment is performed to harmonize the scene with the layered textures, ensuring a balanced and cohesive final image. To further eliminate any lingering "3D" appearance and imbue the image with a more organic, filmic quality, Moore duplicates and merges all layers before applying a subtle grain effect. This final step is instrumental in achieving a polished and visually rich final artwork.
Technical Foundation and Artistic Vision: The Tools of the Trade
The creation of such detailed digital environments relies on a synergistic combination of powerful software and well-honed artistic principles. The workflow described by Moore highlights the essential tools that empower digital artists to bring their visions to life:
- Cinema 4D: A versatile and powerful 3D modeling, animation, and rendering application widely used in motion graphics, VFX, and game development. Its intuitive interface and robust feature set make it ideal for scene layout, object creation, and animation.
- ZBrush: The industry standard for digital sculpting, ZBrush allows artists to create highly detailed organic and hard-surface models with a tactile, clay-like workflow. Its extensive brush system and performance with high polygon counts make it indispensable for intricate terrain sculpting and character modeling.
- Octane Render: A physically-based, GPU-accelerated rendering engine known for its speed and realism. Octane’s ability to produce photorealistic lighting and material interactions is crucial for achieving the atmospheric depth seen in Moore’s work. Its scatter systems are also invaluable for efficiently populating scenes with natural elements.
- Photoshop: The ubiquitous image editing and manipulation software, Photoshop is essential for post-production refinement. Its extensive suite of tools allows for color correction, compositing, texture painting, and the application of various artistic effects that elevate a render to a finished artwork.
Inspiring Further Exploration: Resources and Tools
For artists looking to expand their digital toolkit and delve deeper into the world of 3D art, several resources are invaluable:
- Blender Tutorials: While Moore’s tutorial focuses on a specific software suite, open-source alternatives like Blender offer a comprehensive and powerful free platform for 3D creation. A wealth of tutorials exist to guide users through its extensive capabilities.
- Best 3D Modelling Software Guides: Staying abreast of the latest advancements in 3D modeling software is crucial for any aspiring artist. Resources that compare and contrast different software packages can help artists make informed decisions about their toolset.
- Best Laptops for 3D Modelling: The demands of 3D rendering and sculpting necessitate powerful hardware. Guides detailing the best laptops for 3D modeling can help artists equip themselves with machines capable of handling complex projects efficiently.
- Drawing Tablets: The tactile nature of digital art often requires specialized input devices. A high-quality drawing tablet, such as those offered by XPPen and Huion, provides the precision and pressure sensitivity necessary for detailed work, from sculpting to texture painting. Brands like XPPen offer a range of models, from portable displays like the Artist 13.3 Pro V2 to larger, more immersive screens like the Artist Pro 22 Gen 2. Huion also provides robust options like the Inspiroy 2 Medium, and the XPPen Deco 01 V3 offers a budget-friendly yet capable entry point for digital artists.
Conclusion: The Art of Digital Storytelling
Calder Moore’s tutorial serves as a compelling masterclass in digital landscape creation, demonstrating that the most captivating scenes are born from a meticulous blend of technical proficiency and profound artistic intuition. By breaking down complex processes into manageable steps, leveraging the strengths of industry-leading software, and prioritizing inspiration and thoughtful refinement, artists can embark on their own journeys to craft immersive and evocative digital worlds. The art of 3D landscape creation is not merely about assembling polygons; it is about weaving narratives, evoking emotions, and ultimately, transporting viewers to realms that exist only within the boundless imagination.