
A Brush With Greatness: The Art of Bringing Kuri, the Falconer, to Life – Part One: Preparation and Initial Skin Tones
Introduction to "Brush With Greatness": Unveiling Kuri, the Falconer
Welcome to the latest installment of "Brush With Greatness," a series dedicated to the intricate art of miniature painting and bust sculpture. In this segment, we embark on the second major project of our artistic journey: the formidable bust of Kuri, the Falconer. This exceptional piece, originating from Black Crow Miniatures, is a testament to the collaborative brilliance of sculptor Elina Karimova, who meticulously brought to life the compelling artwork of Guillermo Gonzalez.
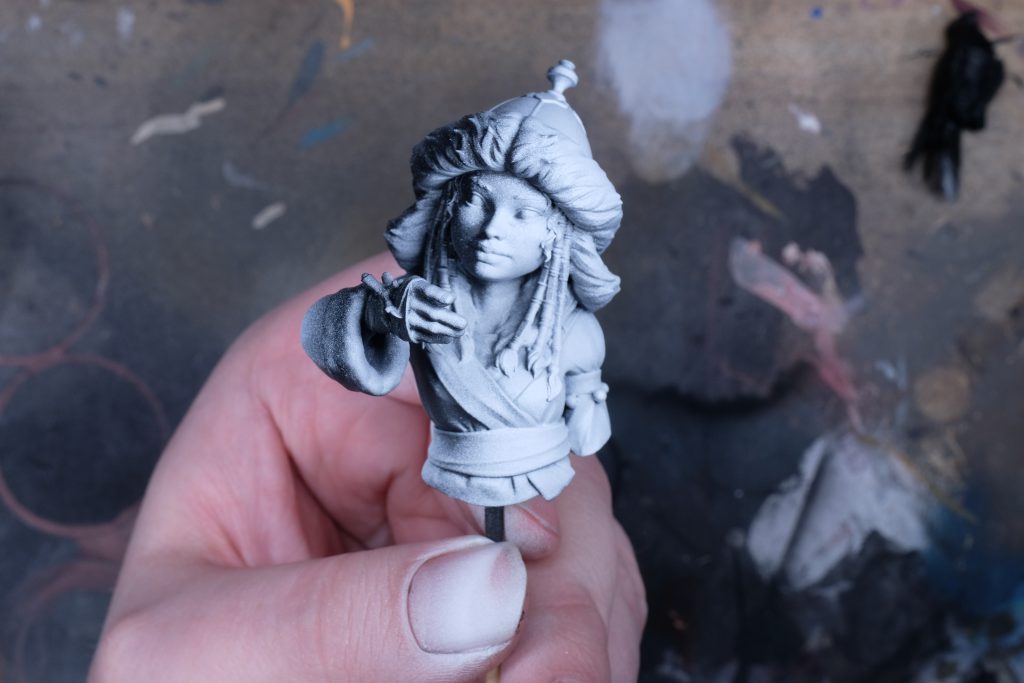
From the moment Kuri graced the Black Crow website, her unique aesthetic and profound character resonated deeply. The miniature captures an evocative blend of strength and mystique, characterized by her distinctive steppe robe and hat, which speak volumes of her rugged environment and nomadic spirit. The kit itself offers an intriguing choice for Kuri’s outstretched hand: either a majestic hawk, embodying the traditional art of falconry, or a fantastical dragon, hinting at a world beyond our own. After careful consideration, the more grounded yet equally captivating hawk was chosen, a decision driven by a personal appreciation for avian artistry and a desire to explore a more realistic, albeit still dramatic, narrative. This choice underscores the meticulous planning that precedes every brushstroke in high-level miniature painting, where every detail contributes to the overall story and visual impact of the piece.
(Image: Kuri Bust – Initial look, perhaps with the hawk)
The Foundation of Excellence: Meticulous Preparation
The journey to a truly exceptional painted miniature begins long before the first application of color. It commences with a series of crucial preparatory steps, particularly vital when working with cast resin models. These initial stages, though seemingly mundane, are the bedrock upon which all subsequent artistic endeavors rest, ensuring optimal paint adhesion, a flawless surface, and, crucially, the safety of the artist.
The Critical First Step: Resin Cleaning and the "Bathtime" Ritual
Cast resin models, like the exquisite Kuri bust, arrive with a fundamental characteristic that necessitates immediate attention: the presence of a release agent. During the manufacturing process, moulds are treated with a substance—typically a grease, wax, or oil—designed to prevent the newly cast resin from adhering to the mould walls. This "release agent" is indispensable for successful demolding, much like greasing a baking tin ensures a cake can be easily removed. However, this protective layer, while facilitating production, poses a significant challenge for the painter: it creates a slick barrier that paint struggles to adhere to. Attempting to prime or paint over an uncleaned resin model is an exercise in frustration, inevitably leading to paint peeling, chipping, or failing to cover uniformly. The resulting "mess" is not merely an aesthetic inconvenience but a structural failure of the paint job itself.
To effectively combat this, a thorough cleaning process, affectionately termed "bathtime," is paramount. The solution lies in the remarkable efficacy of common dish soap, specifically formulated to emulsify and cut through fats and oils. The process involves submerging the resin components in a bowl of warm water mixed with dish soap. An old toothbrush becomes an invaluable tool, allowing for meticulous scrubbing of every surface, nook, and cranny. These intricate details and recessed areas are particularly prone to retaining release agent, making diligent attention to them essential. The warm water aids in loosening the greasy residue, while the mechanical action of the toothbrush ensures its dislodgment.
However, the cleaning process presents a secondary challenge: soap itself can interfere with paint adhesion if not completely removed. Therefore, a separate bowl of clean, warm water is indispensable for rinsing. The absence of dyes or distinctive colors in most release agents complicates visual confirmation of their complete removal. On broad, flat, or raised surfaces, the difference is often perceptible: a properly cleaned surface will exhibit a matte, uniform appearance, contrasting with the residual sheen of an uncleaned area. A dry fingertip test can offer further confirmation; a clean resin surface will feel slightly rougher and more "grabby," providing a tactile indicator of readiness. For the more challenging recesses and intricate details, the painter must rely on thoroughness, systematically working the toothbrush into every conceivable space, followed by a rigorous rinse. After the soapy residue has been completely flushed away, a final rinse under cold tap water helps to set the resin. The components are then carefully dried, initially with a soft paper towel to absorb excess moisture, followed by a gentle application of a hairdryer on a low setting to ensure complete dryness without risking heat damage to the resin. This comprehensive cleaning and drying ritual establishes a pristine, receptive surface for subsequent priming and painting, guaranteeing the longevity and quality of the finished piece.
Refining the Canvas: Flash, Gates, and Mould Line Removal
With the resin thoroughly cleaned and dried, the next critical phase involves refining the raw cast components. This stage addresses any residual imperfections from the casting process, ensuring the model presents a smooth, flawless canvas for painting. Common imperfections include "flash," thin wisps of resin that escape into tiny gaps in the mould; "gates," the points where resin entered the mould and must be carefully removed; and "mould lines," subtle ridges formed where the halves of the mould meet. These seemingly minor blemishes, if left unaddressed, can significantly detract from the finished model’s aesthetic quality, appearing as unnatural lines or rough textures under paint.
The discerning eye and a steady hand are crucial here. Each component must be meticulously inspected under good lighting to identify all such imperfections. For their removal, the choice of tool is paramount. While hobby knives and specialized files are often employed for coarser removal, for the delicate and precise work required on a high-quality bust, an ultra-fine abrasive is preferred. The author’s tool of choice for this particular refinement is P1200 ultra-fine sandpaper, graded according to the FEPA (Federation of European Producers of Abrasives) standard. This exceedingly fine grit acts more as a polishing material than an abrasive, allowing for the careful removal of unwanted material with minimal risk of scratching or marring the surrounding surface.
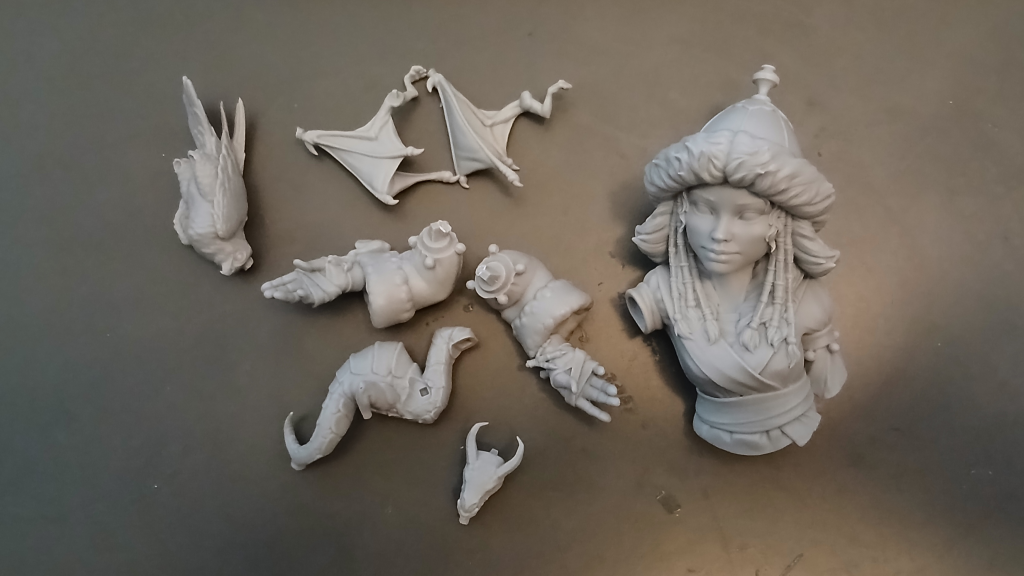
The technique involves gently working the sandpaper over the identified areas, applying minimal pressure and employing a careful, controlled motion. The goal is not merely to remove the imperfection but to seamlessly integrate the refined area with the surrounding surface, achieving a super smooth and uniform finish. This meticulous approach ensures that once primed and painted, the model’s inherent details shine through without interruption from casting artifacts. Furthermore, during this stage, decisions regarding sub-assembly are often finalized. For Kuri, the decision was made to keep the arm and the hawk separate from the main bust during the initial painting stages. This strategic choice provides unobstructed access to the face, which, as the focal point of any bust and a primary draw for the human eye, demands the utmost attention and ease of access for detailed painting. Such foresight in assembly planning allows for a more efficient and higher-quality painting process, especially for the intricate facial features.
(Image: Health and Safety infographic)
Prioritizing Health: Essential Safety Protocols for Resin Work
While the pursuit of artistic excellence in miniature painting is a rewarding endeavor, it is crucial to acknowledge and mitigate the inherent risks associated with working with certain materials, particularly cast resin. The importance of safety cannot be overstated, and adherence to established protocols is not merely advisable but absolutely imperative for the long-term well-being of the artist.

The Dangers of Uncured Resin: Sourcing and Handling
A significant, yet often overlooked, hazard in resin work stems from the possibility of encountering uncured resin. While reputable manufacturers meticulously cure their resin products, there remains a risk, particularly when sourcing from less established or home-based casters, that a model might contain internal voids filled with liquid, uncured resin. This scenario, colloquially likened to "the world’s worst Cadbury Creme Egg," presents a serious health risk.
Uncured resin is a potent chemical irritant and sensitizer. Direct skin contact can lead to severe chemical burns, characterized by redness, blistering, and persistent irritation. Furthermore, uncured resin emits volatile organic compounds (VOCs) that can irritate the respiratory system, causing coughing, shortness of breath, and other adverse pulmonary reactions. In cases where models with hollow parts are not properly vented during casting, uncured resin can become trapped, posing a latent threat should the model be accidentally damaged or cut into. Therefore, a fundamental safety measure is to exclusively procure cast resin models from reputable vendors. These manufacturers adhere to stringent quality control processes, ensuring their products are fully cured and safely handled, thereby minimizing the risk of encountering hazardous uncured material. Awareness and responsible sourcing are the first lines of defense against this particular hazard.
Protecting Your Lungs: The Imperative of Respiratory Protection
Perhaps the most critical safety concern when working with resin models is the generation of resin dust during filing, sanding, or cutting. This dust, often microscopic and seemingly innocuous, poses a severe and cumulative threat to respiratory health. Despite common misconceptions about personal resilience or age, the human respiratory system is uniquely vulnerable to these fine particulate materials.
When resin dust is inhaled, it bypasses the body’s natural defense mechanisms—the nasal hairs, mucus linings, and cilia—and penetrates deep into the lungs. Once lodged within the delicate lung tissue, the sharp, abrasive resin particles act as persistent irritants. Over time, and with repeated exposure, this irritation triggers an inflammatory response that leads to the formation of scar tissue. This condition is known as pulmonary fibrosis.
Pulmonary fibrosis is a progressive and irreversible lung disease. The scars that form within the lungs impair their ability to expand and contract efficiently, reducing the overall lung capacity and hindering the exchange of oxygen and carbon dioxide. Each subsequent exposure to resin dust exacerbates this scarring, progressively diminishing lung function and making breathing increasingly difficult. This damage is permanent, and its effects accumulate over a lifetime. The ability to breathe effortlessly is a fundamental aspect of health, often taken for granted until it is compromised. Therefore, taking proactive measures to protect the lungs is non-negotiable.
The most effective protection against resin dust inhalation is the use of appropriate respiratory gear. While a basic dust mask offers some minimal protection, a certified respirator is highly recommended for any prolonged or frequent resin work. Respirators, particularly those with P100 particulate filters, provide a much higher level of filtration, effectively trapping even the finest resin particles before they can enter the respiratory system. In addition to wearing a mask, other best practices include:
- Working in a well-ventilated area: This helps to disperse airborne particles.
- Using a wet sanding technique: Dampening the resin surface before sanding significantly reduces the amount of airborne dust generated.
- Regular cleanup: Utilizing a HEPA-filtered vacuum cleaner rather than sweeping or blowing dust, which can re-aerosolize particles.
These precautions are not merely recommendations; they are vital safeguards for maintaining long-term respiratory health. The temporary inconvenience of wearing a respirator is a small price to pay for the invaluable ability to breathe freely for years to come.
(Image: Kuri bust temporarily assembled with white-tac)
Laying the Groundwork: Priming and Initial Lighting Studies
With all preparatory stages meticulously completed—the resin cleaned, imperfections removed, and safety protocols observed—the focus shifts to the foundational layers of paint. This phase involves priming the model and establishing the preliminary lighting scheme, setting the stage for the intricate painting process that follows.
The Art of Priming: Creating a Cohesive Base
Priming is a fundamental step in miniature painting, serving multiple critical functions. Firstly, it creates a uniform surface that promotes optimal adhesion for subsequent paint layers, preventing chipping and ensuring durability. Secondly, it provides a consistent base color, eliminating variations in the resin’s natural tone that could otherwise interfere with the perception of overlying colors. Finally, the chosen primer color can significantly influence the overall mood and vibrancy of the final paint job, acting as either a subtle underpainting or a strong contributing element to the shadows.
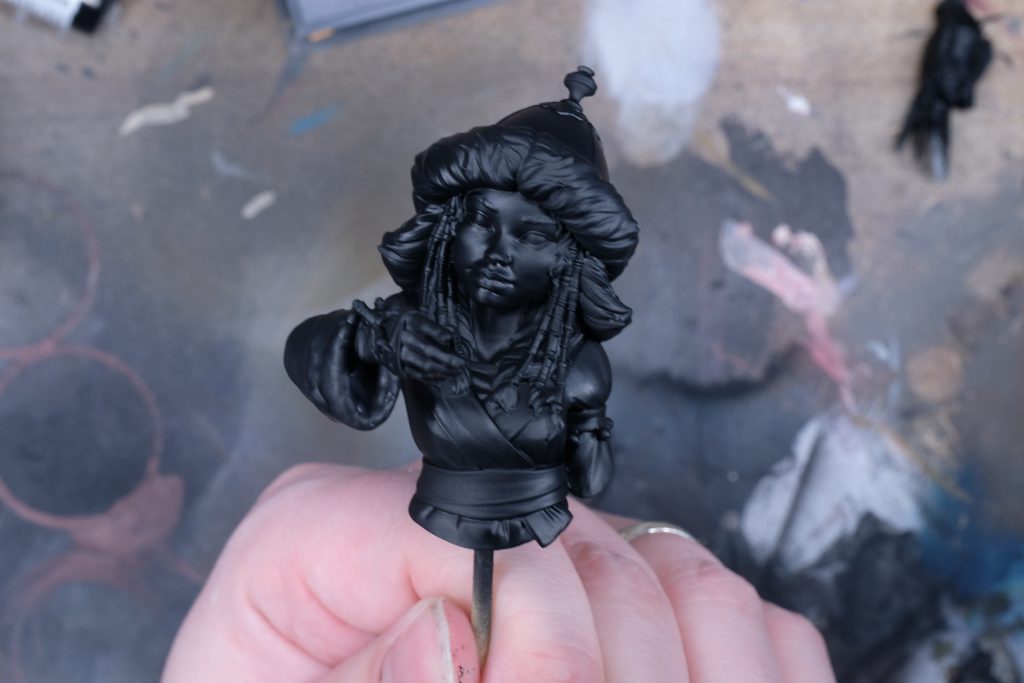
For the Kuri bust, the priming process involved a careful application of Army Painter Air black primer. Rather than flooding the model with a single heavy coat, the primer was applied in several thin, even layers. This technique is crucial for preserving the intricate details of the sculpture, preventing them from being obscured by thick paint. Building up coverage gradually ensures a smooth, consistent finish without sacrificing crispness.
The deliberate choice of black primer for this project is strategic. Black primer acts as a natural shade, allowing subsequent layers of paint to be built up from darkness, contributing to a rich, deep appearance. It provides inherent depth to the shadows, which will be gradually illuminated by lighter colors. While white or grey primers offer different advantages (such as brighter final colors or easier color judgment), black primer is particularly effective for busts where dramatic contrast and deep, resonant shadows are desired. This initial black layer serves as a visual anchor, against which all subsequent highlights and mid-tones will be measured, guiding the artist’s hand towards a compelling and dynamic presentation.
Defining Form with Light: Embracing Rembrandt’s Influence
Following the complete application of the black primer, the next artistic decision involves establishing a clear and consistent light source for the bust. This pre-visualization of light and shadow is paramount, as it dictates where highlights will be placed and how shadows will deepen, ultimately defining the model’s three-dimensional form and emotional impact. For Kuri, a Rembrandt-style side light was chosen, originating from the model’s left.
Rembrandt lighting, characterized by a single, dramatic light source positioned to one side and slightly above the subject, is renowned for creating striking contrasts between light and shadow. This technique often produces a distinctive triangle of light on the shadowed side of the face (the "Rembrandt triangle"), adding depth, mood, and a sense of drama. By consciously selecting this lighting scheme, the painter commits to a specific narrative of illumination, guiding the subsequent application of paint to sculpt the form through light.
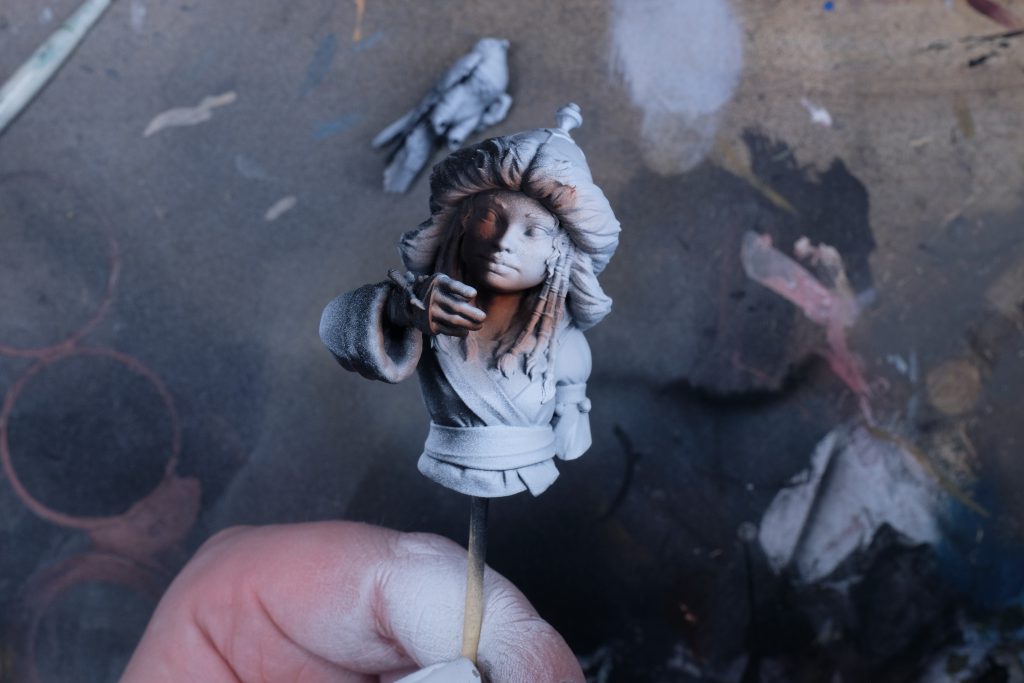
To establish these initial highlights, a controlled application of white paint was performed. White, notoriously challenging to spray smoothly, requires particular finesse. Even with alcohol-based paints like Molotow White, achieving a perfectly smooth, non-speckled finish can be elusive. Despite careful application, a slight speckliness was noted in this initial white pass. However, at this foundational stage, the primary goal is to map out the areas that will catch the most light according to the chosen Rembrandt scheme. The slight imperfections in the white application are less critical, as these layers will be subsequently covered and blended with other colors, their purpose being to define volume and directionality rather than serving as a final finish. This initial light mapping provides a crucial visual guide for the subsequent steps, ensuring that the interplay of light and shadow remains consistent and impactful throughout the painting process.
(Image: Kuri bust after black prime and white highlight)
Bringing Kuri to Life: The Nuances of Skin Tones
With the foundational priming and initial light studies complete, the focus narrows to the most expressive and challenging aspect of any bust: the skin tones. Achieving realistic and vibrant flesh requires careful layering and an understanding of how colors interact, particularly in the interplay of light and shadow.
Countering the "Blue Shift Effect" for Realistic Flesh
A common challenge encountered when painting skin tones over a black prime is what renowned painter Juan Hidalgo refers to as the "blue shift effect." When skin tones are applied directly over deep black shadows, the underlying black can subtly tint the flesh colors, imparting a grayish or bluish hue. This phenomenon can make the skin appear unnaturally pale, desaturated, and lifeless – a "corpse-like" appearance that detracts significantly from the vitality of the bust.
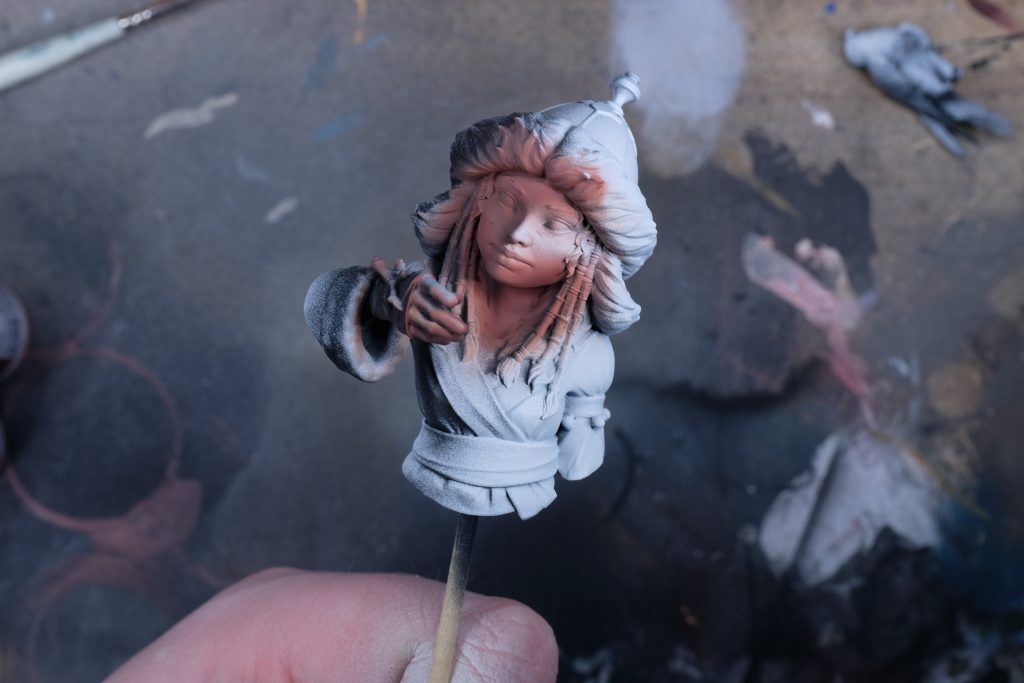
To preempt this undesirable effect, Hidalgo advocates for a strategic intermediate step: spraying the shadowed areas with a flesh-colored speedpaint before applying the primary skin tones. This technique effectively "warms up" the shadows, neutralizing the cool undertones that black would otherwise impart. For this project, the author employed Army Painter Speedpaint 2.0 Crusader Skin, applying it specifically to the areas designated as shadows by the earlier black prime and white highlight. The effect is immediate and profound: the shadows, rather than appearing stark and cold, now possess a natural, warm undertone, providing a much more appropriate and lifelike foundation for the subsequent skin layers. This proactive measure is critical for achieving a healthy, vibrant complexion, ensuring that the skin tones retain their intended warmth and luminosity even in the deepest recesses.
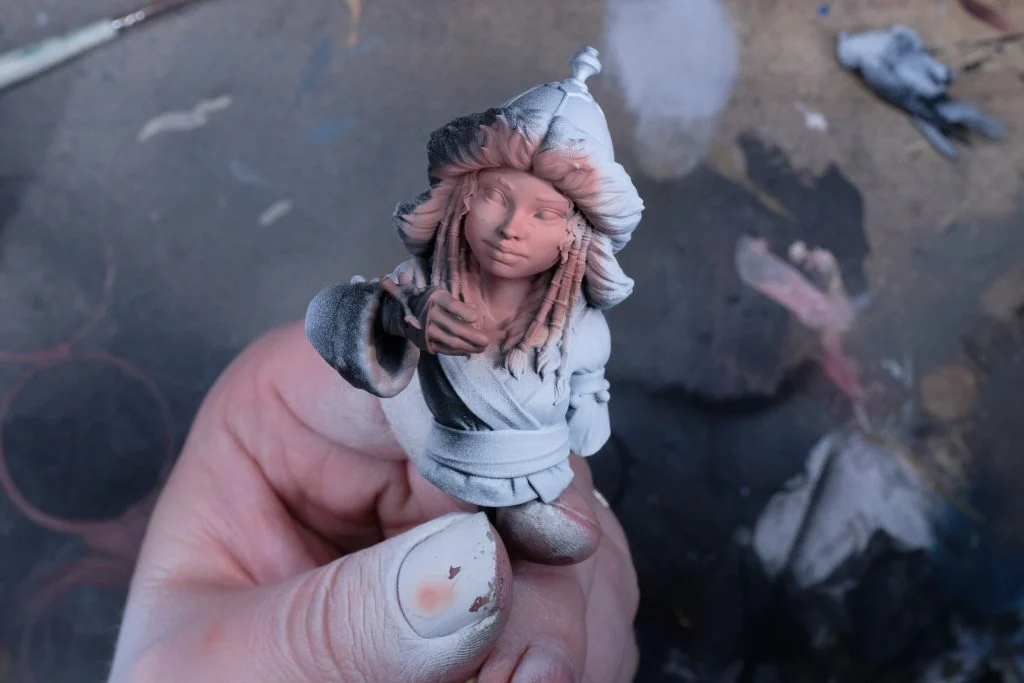
(Image: Kuri bust after flesh-toned speedpaint in shadows – two angles)
Building Depth: Layering Base and Highlight Tones
With the "blue shift effect" successfully mitigated, the process of building up the skin tones proper could commence. This involves a careful layering of base colors and subsequent highlights, meticulously defining the contours and textures of Kuri’s face.
The initial base color for the skin was established using Vallejo Game Color Athena Skin. This paint, typically thicker for brush application, was thinned with a combination of standard thinner and water to achieve an ideal consistency for airbrushing. While a dedicated Game Air variant would be an option, the thinned Game Color performs admirably, allowing for smooth, even coats through the airbrush. This layer provided a consistent, foundational skin tone over the warmed-up shadows, creating a cohesive mid-tone across the face.
Hot on the heels of the Athena Skin, the next step involved further defining the facial volumes by applying a lighter shade: Vallejo Game Color Pale Skin. This was strategically airbrushed onto the most prominent features of the face, specifically the cheeks, the bridge of the nose, and the chin. By concentrating this lighter color on these raised areas, the illusion of three-dimensionality is enhanced, bringing forward the contours that define Kuri’s unique facial structure.
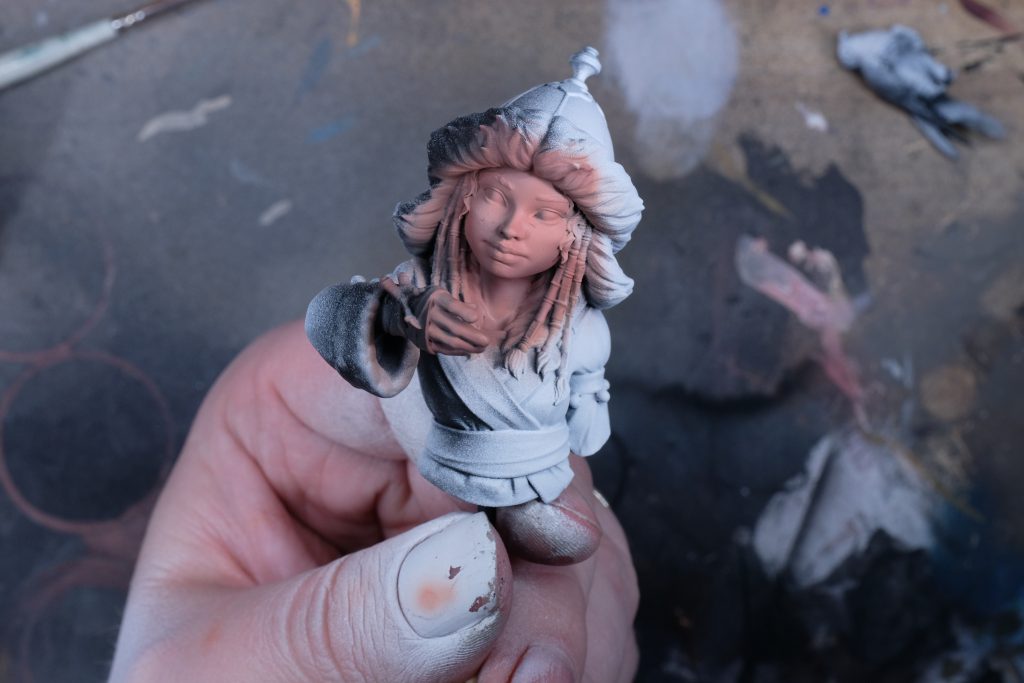
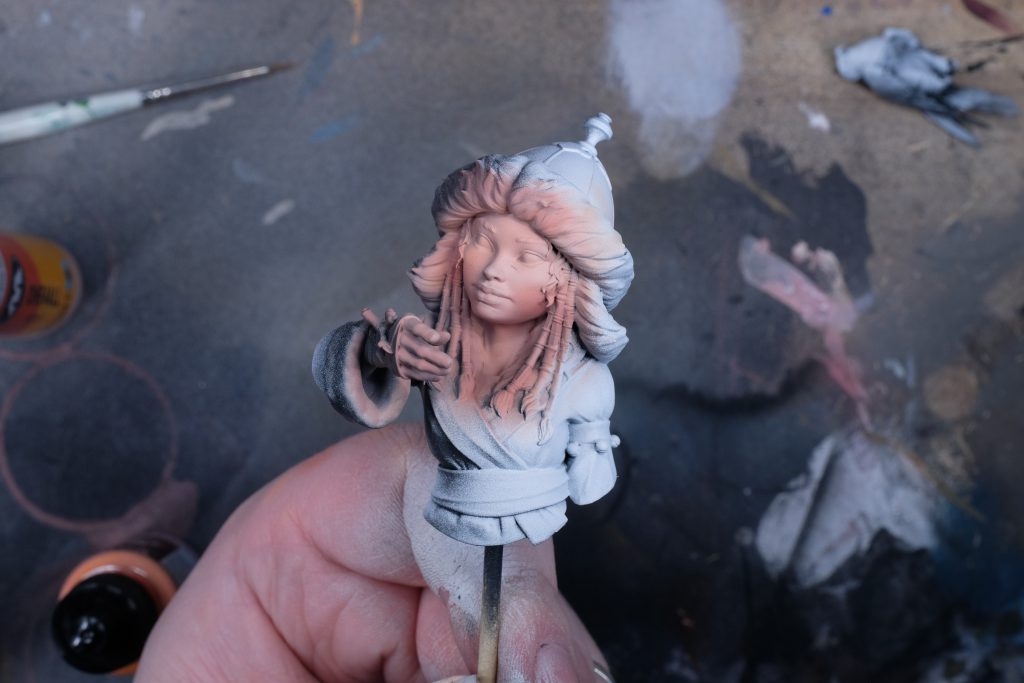
Despite these initial layers, the face appeared somewhat too pale, lacking the desired depth and richness. To rectify this, a crucial corrective step was undertaken by reintroducing warmth and shadow using additional speedpaints. A combination of Speedpaint Crusader Skin and Goddess Glow was carefully applied to areas where deeper shadows and richer tones were desired. This included the hollows of the cheeks, beneath the brim of the hat where shadow would naturally fall, and underneath the chin. The controlled application of these speedpaints allowed for nuanced transitions and added a vital layer of complexity to the skin tones, preventing a flat or monochromatic appearance. The result was a more vibrant and believable complexion, where light and shadow played off each other to create a dynamic and lifelike portrait.
(Image: Kuri bust after Pale Skin and Speedpaint layers – two angles)
Conclusion: A Glimpse into Kuri’s Evolving Narrative
At this juncture, the airbrushing work on Kuri’s skin has been meticulously completed, establishing a vibrant and dynamic foundation that promises a compelling final presentation. The journey has traversed the essential stages of preparation, encompassing the critical cleaning of resin components, the meticulous removal of casting imperfections, and a rigorous adherence to safety protocols—all indispensable steps for both the quality of the artwork and the well-being of the artist. The subsequent priming and initial light mapping have set the stage, guided by the dramatic principles of Rembrandt lighting, before delving into the intricate process of building up realistic skin tones, expertly countering the "blue shift effect" and layering colors to achieve profound depth and vitality.
The face of Kuri now emanates a nascent character, awaiting the vibrant details that will fully articulate her persona. The next installment of "Brush With Greatness" will delve into the equally intricate process of airbrushing her distinctive steppe robe and hat, further enriching the narrative and visual complexity of this magnificent bust. Stay tuned as we continue to breathe life into this exceptional miniature.
We greatly value the engagement and insights of our readers. Should you have any questions regarding the techniques discussed, comments on the progress, or require personalized hobby advice, please do not hesitate to reach out via email at [email protected]. Patrons of Tabletop Battles are also encouraged to connect through our dedicated Discord channel for direct interaction and community support. Your feedback and queries are always welcomed and contribute significantly to the vibrancy of our artistic community.
Have any questions or feedback? Drop us a note in the comments below or email us at [email protected]. Want articles like this linked in your inbox every Monday morning? Sign up for our newsletter. And don’t forget that you can support us on Patreon for backer rewards like early video content, Administratum access, an ad-free experience on our website, and subscriber-only content covering competitive Warhammer 40K!


Leave a Comment